TIP 1: On Interlining...
The best advice when you're interlining something that will be curved when you wear it is to pin it when it's curved to keep it from buckling. Keeping it draped over your thigh works well.
The second best piece of advice about interlining is... don't interline, interface. I know, it isn't period. It's also not out where anyone can see it. No one knows but you and your sewing machine and it gives you that smooth structured look you're seeking with less fuss.
Cut it out, line it up and (if it's the fusible variety) iron it on. It's that easy.
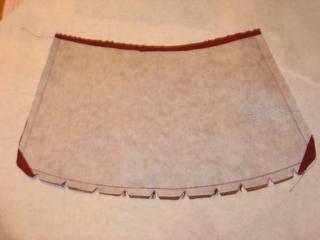
Whether you're interlining or interfacing, if you're working with a piece that needs to be turned later (sewn right sides together and then turned rightside out for a finished edge); cut off the corners before you iron it on, as seen here in this terribly out of focus photo...
Despite the poor picture quality (I'll try to get a better picture when I'm making the next one.) I hope you can still see what I mean. The tabbed-looking cuts on the outside curve are just as important to getting a smooth edge once it's turned right-side-out. Just about every book on sewing tells you to do this, and so do most commercial patterns. Very few of give a good example of why. Doing this gives you less bulk to contend with in the corners and helps stave off 'conical corner syndrome' as well as getting the fabric out of its own way. This will allow a graceful curve when all that waste you just cut divots out of is on the inside.
Oh! When I first started my math never seemed to turn out right and I always ended up with too many or too few tabs for the waist of my doublets. I'm still not sure why. Just measure the heck out of it and you'll waste less fabric. Or, as Norm Abrams from The New Yankee Workshop might say: "measure twice and cut once".
See? I told you this was a sewing site for men!


No comments:
Post a Comment