Use what is most comfortable for you. Carving knives that are worth your time start at about $20.00 and go up from there. Spend less than that at your own risk. The carving knives I use are "Flexcut" knives sold by Rockler woodworking. It's a nice level of tool for the serious hobbiest.
It's been pointed out elsewhere that when I talked about doweling a nose-piece in place last post, I did not complete the thought.
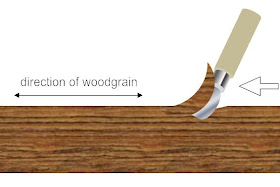
Why didn't I just use a larger piece of wood and carve the whole thing in one piece? The short answer is grain lines. Whenever you are carving, life is significantly easier if your blade is moving parallel to the grain.
In order to keep the grainlines aligned to the path of the blade, it's sometimes better to make the wood match the carving rather than vice-versa. When your goal is to have a finished display piece, this might not be a desirable thing to do, but in this case, we're just making a form for leather to stretch over.
I did this by doweling a nose piece perpendicular to the face so that whether I was carving the cheekbones or the nose, my blade is carving cross-grain as little as possible.
Once I was finished with the blade, I used a sanding wheel on my Dremel tool to round and smooth the planes of the face. If you don't have a Dremel tool, you can do this with sandpaper, it will just take a bit longer.
Honestly, you could probably just skip this part, because theoretically, the goal here is to have something to stretch leather over, not to make something to sit on the shelf. I like to make them suitable for the shelf because the more of these I make, the harder it is to avoid looking at them, so I might as well make them pretty.
This is the final form once it has been sanded and finished with spar urethane (above). I used spar urethane because the leather is wet when it's applied to the wood and the added protection helps the mask form to last longer.
I then traced around the mask on a 1X4 and cut it out, attaching it to the back of the form with screws so that I can change it out. This is a waste piece of wood into which many nails and staples will be driven, so it's important to be able to swap it out if you want to make more than a couple of masks from the same form.
NOTE: If you watched that video and chose to work in concrete for your form, Thurston James advises leaving a hollow in the back of the form and in the eyeholes to be filled with Plastic Wood for the same reasons. You will periodically have to refresh the plastic wood in that case to allow for future nails to be set.


No comments:
Post a Comment