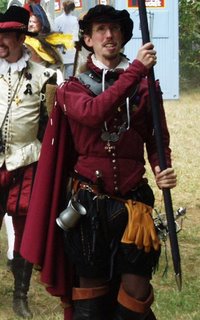
24 October 2006

Cutting the Mustard

Because 'Sewing the Mustard' simply didn't make sense and I can't resist a pun.

Abigail asked why I had something against button plackets. Other than the fact that I don’t like them, I’ve had trouble documenting their existence. I’ve doublechecked since I first responded to her comment, and while there are certainly a number of paintings depicting a sectioned-off part of the front of the subjects’ doublet or jerkin -- the research of the inestimable Janet Arnold (Patterns of Fashion 1560-1620) indicates to me that by and large these were sections of the front pieces separated by parallel lines of decorative trim rather than separately-cut and then sewn-on pieces.

That being said, if you're planning to do your buttonholes on a machine, it's a heckuva lot easier to feed a placket piece through the needle and then sew it on. You can always disguise the seam with trim if you're doing something upper to middle class in your design. If it's peasant wear, I think they did it anyway they could make it work, and you can feel free to quote me on that... not that it would necessarily persuade anyone, but sometimes it helps to know you have company.

While I’ll never be one to claim that any one historian’s findings are definitive (so very few period garments have survived into the current era for us to study) I’ll stand by this assertion. It has been noted that of the surviving garments from the Mary Rose, no two were assembled in quite the same manner.

So I am left with an aesthetic decision, doing what feels right.
(shrug)

On Page 55 of my copy of Patterns of Fashion is a simple man’s doublet circa 1574, the Cosimo de’Medici doublet. I have decided to base my new doublet on this one. It has all the features I desire: simple lines, a cut-work edging treatment similar to the one I already used to adorn the collar of the rust jerkin.

I’ve been tinkering with my pattern almost non-stop and I am still frustrated by the wrinkle in the collar. I think I may be simply too thin or too long of neck (or God knows what) to get it to fit properly. Old Cosimo was apparently a pretty stocky guy. Unfortunately, the collar in POF is of the type I’ve been wrestling with and - frankly - I’m tired of messing with it. I need to do more research, consult some experts, and maybe make another three or four muslin mockups, but I want to get moving on the rest of this project… so I’ve decided to scrap that part of the plan and move ahead while I do separate experiments.

Yup, it didn’t work, so I’m going to change it. Artistic license. Later in the period, there were plenty of doublets made with separately-pieced collars, so I shall go and do likewise. They call that “rationalizing” I think. Perfectly healthy. Nothing to worry about.

(ahem)

TODAY’S TIP: If you hit a wall, there might be better ways to circumvent it than to keep banging your head against it. Don’t be afraid to change your original idea or to scrap the project and start over. It’s okay to admit you’ve bitten off more than you currently have time to chew. It’s okay, save some for later. It’s not as though this is your last project. If you can’t do it today, something you learn tomorrow might make it easier.
Freed of the need to mess around anymore with that daggum collar, I’ve managed to build the body of the doublet.
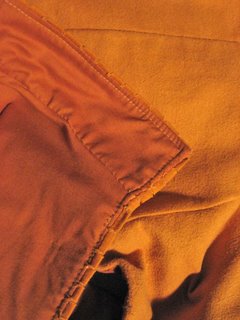

This is a shot to show (mainly) the cutwork edge treatment. As described in POF, I folded over a strip of bias-cut cotton and sewed it into the seam. Then I took thread scissors and made little snips every… well, Janet Arnold notes that there doesn’t seem to be a set measurement on the originals so who am I to quibble? I made the cuts the width of my thumb apart from one another. NOTE: I didn’t make a slice, but a little divot, so as to allow the cuts a little fraying, but not too much as I don’t want it to ravel completely.


Here’s a closeup of the collar. Note that I flat-lined the doublet entire in butterscotch cotton. Remember that for the most part, this doublet needs to be wearable during the height of summer. (It's about time I had something that was)
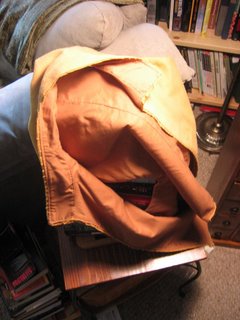

This is another shot of the lining and edging as well as giving some inkling as to the build of the ‘chassis’ of the doublet. These are the bones over which everything else will be laid.


This gives better view of seam arrangement. Another change I made to the Cosimo de’Medici doublet is that the back of mine is ‘princess’ cut (for want of a manlier term) for the same reason that period tailors did it… to conserve fabric. I only have so much of this mustard flannel to play with.

Come to think on it, this also shows how desperately I need to build some more bookshelves. Another tip... sometimes you don't really see something unless you're looking at a picture of it.

Alas, a project for another day.

By The Way...
October marks the One-year anniversary of the creation of this blog. Whoopee!! Thanks to everyone who has been quietly frustrated with my procrastinating this past year. I'll try to do better in year two.

Incidentally, one year ago today I was the first day I first wrestled with that damn pucker on the rust-colored jerkin!
Plus ça change, plus c'est la même chose I suppose.


20 October 2006

Doublet Deux

Getting back on track...

When last we left our intrepid seamstre… um, tailor, he was endeavoring to draft a new pattern (ignoring for the moment all of the side projects like the marrionette…) which took into account the shortcomings of the old, and create a new doublet to his liking that can go on to form the moderating and contrasting base for a more flamboyant jerkin which shall overlay. Are you with me now?

NOTE: Plum color for mockup purposes only.
See previous post for tips on mocking-up...

As you may recall, the color scheme here is autumnal in nature, drawing from my favorite earthtones of rust and mustard (thankfully I’m making garb and not sandwiches, but I digress). The colors were inspired by my favorite set of juggling balls, I kid you not. There’s a picture back in an earlier post if you want to take a look. We find inspiration where'er it hides. Unlike the earlier jerkin project, which incorporated a number of techniques and ideas that were new to me, I have a good deal more experience making doublets and even my past noble projects have followed simpler lines, as I generally believe in letting carefully-chosen textured fabrics speak for themselves. I think that this lends a certain nuance to costuming that helps in bringing me down on my preferred side of the dividing line between my character’s everyday clothing and a costume worn for a weekend and meant to last only that long.

TODAY'S TIP... Draw inspiration from what you've done. This includes acknowledging and mending past errors, and distilling the best bits from the last few projects to make the newest project a culmination of all you've learnt so far.

Above is a photo of me looking pompous in an early noble costume of mine. If you’ve read some of my older posts, you’ve likely seen it before in the parrot picture. I like the quilted fabric and the simple lines of the doublet. I need to dig it out and take some more detailed shots ere we discuss shoulder and waist treatments, because I was particularly fond of this one. Small ½ inch loops of match-dyed cotton are sewn into the seams of the waist and shoulders as well as around the collar with the intent of eventually forming a supportasse for a ruff I never quite got around to making.
PRO: Good use of texture, simple lines
CON: Button placket, never made ruff so the collar just came off as a little silly


Below are some shots of another doublet o’ mine that I am particularly fond of. The cotton canvas is a sage green (much faded by the suns of a dozen faires) of very much the same weight as the rust-colored stuff I used for the jerkin project. I like the heavy open-weave texture of it and the way it turns supple with time and wear. I even like the way it fades, though this doublet started out solidly middle class and has degraded somewhat with wear to a lower middle class garment. But that’s part of its charm, methinks.

PRO: Simple lines, very workmanlike and utilitarian, love the pewter buttons (difficult to see in the picture), Best fitting of all my doublets so far.
CON: Fit might belie the doublet's class somewhat, has a button placket

A SIDENOTE ON THE SUBJECT OF FITTING… I am a slender fellow. The name “Ichabod Crane” leaps to mind when I flounder about for a literary reference to describe myself. As such, I oft-times find it difficult to draft all the wrinkly bits and pudgy bits out of my doublets. This used to drive me to destraction until I started to look, and I mean really LOOK at the renaissance portraiture, especially that of senor Moroni. I have been especially inspired (as are many male costumers) by the cut of the Tailor’s doublet and the places in which Moroni recorded the folds and buckling of the fabric in the man’s pinked and slashed white doublet. Many of these ‘faults’ are the very same ones I’ve been tearing my hair out trying to correct for years. And that guy was a tailor, for heaven’s sake! Many of his other paintings bear this out, as do many other painters of the period. Many of the perfect flat front garments in Northern Renaissance paintings were clearly boned or starched when they weren’t stuffed into unrealistically taut potbellies by adding sewn-in bags of cornmeal or the like.

The doublet in the inspiration picture (derived from a painting by mannerist master Moroni) doesn’t lend us much of a clue as to the cut of the man’s doublet other than that spiffy sleeve which is either cutte or tightly paned (I've seen it duplicated both ways with some success) which I am not currently planning to replicate… at least not right away. Other than the color, it is difficult to deduce much at all about the inner garments. The hang of the outer garment suggest that the doublet would be close-cut rather than stuffed with bombast in the peas cod style, more akin to a soldier’s arming jerkin meant to be worn beneath cuirasses. The body of the doublet might not have matched the fancy sleeves and I would be remiss if I failed to point out that I can by no means be certain that there even was an inner garment between the visible Jerkin with sleeves and his shirt. So I am - by necessity - going to operate under certain assumptions.
  1. The inner garment is a separate piece from the outer jerkin.
  2. The inner garment is a close-fitted doublet of a lighter fabric than the outer and is all of a piece.
I’m not even going to dwell on whether that’s really the collar of his shirt that we see or a renaissance dickie like many of the ladies of the courts wore and called a partlet. Partlet, dickie, you say to-may-to, I say to-mah-to…yada yada yada…

We have already drafted a new pattern for the proposed inner doublet and revisited the previous projects of pertinence to the current endeavor and recapped for those just joining in. Welcome and welcome back all of you…


For the inner doublet I have chosen a lightweight brushed cotton, almost a light flannel in a wonderfully understated mustard color. The buttons will be wooden beads and the shoulder, neck and waist shall be decorated only with a pinked strip of folded bias binding in a matching color as shown in the previous jerkin around the neck and in numerous garments featured in Janet Arnold’s Patterns of Fashion. With the help of my dear ladywife, I have (hopefully) drafted away the annoying wrinkle at the back of the neck and I will once again be using an overlap instead of a button placket for the closure.

Next... assembly.