Showing posts with label Carpentry. Show all posts

29 April 2012

Occasionally I get to go out and play...

Instead of sewing, today I got to go over to a friend's house in my overalls and build stuff and get messy and play with their dogs. (Ren faire is AWESOME!) Which is to say, I've been building sets for the local ren faire again.


After spending most of the week sick with the flu (sadly too sick to really get any sewing done either) I got to get out in the fresh air today in time for a building party.


We're building an inn! Kristin was there to take pictures.

"Then the go-kart track should go over here, and the pin ball machines go along this wall..."


We can't call it an 'inn raising' if we don't stand some of it up at some point...
This building isn't for my guild, I'm labor on this outing, though my guildies certainly turned out to help. The Hearth of St Brigid (my guild) has always carried an ethos of being the cross-guild players, taking the "All for one and one for all" aspect of being a faire player beyond our guildyard, to include the whole of the faire.

We were helping out a new crew that has risen at WMRF called the Guild of Saint Julian that will be portraying an inkeeper and his staff, plus various guests and regulars. The inn will be created like theater flats, decorated and painted and assembled as a modular set that they can add onto over time. 

It's a bit exciting for us since the guilds in our faire have historically operated mostly out of tents. This is the first time our faire and thus our guilds have grown and prospered sufficiently that it's feasible to start assembling real sets.

Fair is in August and there's a lot to do between now and then, but we made great headway today. This is going to be great!


10 August 2011

Maskmaker, Maskmaker Part II :: Carving and Completing the Form

 To make the mask mold for this project, I've been using carving knives like the one shown at left. You don't have to. My grandfather would have made this entire project with his pocket knife, been quite content doing so, and done a better job than I have.

Use what is most comfortable for you. Carving knives that are worth your time start at about $20.00 and go up from there. Spend less than that at your own risk. The carving knives I use are "Flexcut" knives sold by Rockler woodworking. It's a nice level of tool for the serious hobbiest.

It's been pointed out elsewhere that when I talked about doweling a nose-piece in place last post, I did not complete the thought.

Why didn't I just use a larger piece of wood and carve the whole thing in one piece?  The short answer is grain lines.  Whenever you are carving, life is significantly easier if your blade is moving parallel to the grain.
Also, if I was to carve from a larger block, I would have to remove several times more material to get to the final shapes I wanted.

In order to keep the grainlines aligned to the path of the blade, it's sometimes better to make the wood match the carving rather than vice-versa.  When your goal is to have a finished display piece, this might not be a desirable thing to do, but in this case, we're just making a form for leather to stretch over.

I did this by doweling a nose piece perpendicular to the face so that whether I was carving the cheekbones or the nose, my blade is carving cross-grain as little as possible. 


Once I was finished with the blade, I used a sanding wheel on my Dremel tool to round and smooth the planes of the face.  If you don't have a Dremel tool, you can do this with sandpaper, it will just take a bit longer.

Honestly, you could probably just skip this part, because theoretically, the goal here is to have something to stretch leather over, not to make something to sit on the shelf.  I like to make them suitable for the shelf because the more of these I make, the harder it is to avoid looking at them, so I might as well make them pretty.


This is the final form once it has been sanded and finished with spar urethane (above).  I used spar urethane because the leather is wet when it's applied to the wood and the added protection helps the mask form to last longer.

I then traced around the mask on a 1X4 and cut it out, attaching it to the back of the form with screws so that I can change it out.  This is a waste piece of wood into which many nails and staples will be driven, so it's important to be able to swap it out if you want to make more than a couple of masks from the same form.


NOTE: If you watched that video and chose to work in concrete for your form, Thurston James advises leaving a hollow in the back of the form and in the eyeholes to be filled with Plastic Wood for the same reasons.  You will periodically have to refresh the plastic wood in that case to allow for future nails to be set. 


Maskmaker, Maskmaker, Make Me a Mask :: Part I

The number one most requested thing for me to teach is leather maskmaking. I learned by reading books and screwing up a lot. With any luck, I can spare you some of that.

Commedia del Arte is a form of theater designed to be performed by a limited number of actors in a setting that is less than ideal for theater: The Renaissance marketplace. Each actor wears a specific mask and adopts certain prescribed poses that are universal to the form.

The characters bear names like Pantalone, the unscrupulous and grasping old man; Capitano, the strutting braggart; Arlechinno, the clever and (more or less) innocent servant... The iconic masks, poses and well-defined characters allowed the actors to perform amid the bustle of marketplace and festival in a time before microphones. The cavernous noses of the masks have even been alleged to magnify the voices of the actors. . . though I've worn one for years in performances and I can't say as I buy that argument entirely.

Even if you could not hear every word or see them clearly, you knew who was doing what. Even from a distance, there was no question which actor was playing which role, so well-known were the archetypes they portrayed. Even today you would recognize them whether you realize it or not. Harlequin came from commedia. Punch & Judy as well. Shakespeare borrowed shamelessly from his Italian counterparts. Pants are called "pants" as a short form of 'pantaloons' named for the costume worn by Pantalone.

In more theatrical and modern(ish) terms, The Marx Brothers, Monty Python and the Muppets all owe an enormous debt to their frenetic forbears in commedia del arte.


Traditional Italian commedia masks were leather like the one I am wearing above, wetformed over wooden forms.  That's the sort that I'm about to show you how to make.

If you don't have the knack or the interest in carving, rest assured that you can create a mask in clay and then make a positive mold as shown in the YouTube video below, only instead of using fiberglass, fill your mold with the fine concrete used to make stepping stones.  You can then form your leather over that.


The video...

Not only is that okay, it's how Thurston James advises you to proceed in his book The Prop Builder's Mask-Making Handbook (sadly out of print, but still available here and there if you look hard enough) which many consider to be the book on the topic. He hates carving things out of wood, but advises leaving hollows in the back of the mask and eyes to fill with plastic wood for the later steps involving nails.

Unlike Mr. Thurston James, I actually enjoy hand-carving and own all the necessary tools to do so, so that is how I intend to proceed.  If you don't care to join me, you're on your own, I fear, though later lessons about the molding are universally applicable.

But I'm getting ahead of myself already.

So many people protested when I said I was giving up fooling, I wanted to create a poppet or doll in the costume of Calabash.so that he'd still be around. So I'll be making a 1/3 scale version of my mask (pictured below).


All of the following steps will be identical on a full-sized mask, or even for a smaller one. These things can get as small as you choose to make them, though the smaller you get, the less you shall be able to attain intricate details. 

When asked how he sculpted The Thinker, Rodin said he just cut away everything that wasn't his statue and when he was done, voila! I'm not sure that a blog like this is the place to learn woodcarving, but I shall do my best.

The tools I used were a saw, a rasp, and a knife. Keep them all sharp. Be cautious. Wear protective gear as appropriate. Proceed at your own risk.

All carvings begin the same way as Rodin. Woodcarving is just sculpture in a reluctant medium... with a simple block of wood. In this case, I used a chunk of scrap pine.


As the Maestro said, the first thing is to draw the shape on the block and then cut away everything that is not mask. Use a coping saw if you're attached to the notion of period perfection or a power saw if you have one.

 Use a rasp or file to begin beveling edges and beginning to shape the cheekbones, making the mask into a three-dimensional form. 


Once I had the basic shape, I used dowels to attach a piece of 2x2 to make the nose as shown in the profile plan below. I don't have any pictures of that, but the it's really just drill a hole and insert wood and a dowel.

Then continue carving until I had this...


Next, we'll get into some leatherwork, at long last

27 July 2011

Tools of the Trade :: Garb Carpentry

Things you need to make garb: Cloth, sewing machine, needle, thread, scissors, coping saw, drill, hammer, drawknife...


We're not going to build a house, but we are about to get into some fairly involved leatherworking here. "Wet forming" leather requires something to form it around. Usually, this is made out of wood. So, a certain amount of miscellaneous carpentry will be necessary.

It's either that or cast your molds in concrete.

I'm an avid woodworker, so I already have a lot the tools I needed to make the things we'll be talking about in the next month or so.  Some of you will too, or someone in your family or close circle of friends will have tools you can borrow.

There are always things that will make a task easier. A jigsaw is faster than a coping saw just as a lathe is faster than whittling. I'll stop periodically and talk about tools if it's necessary, but here's a very minimal list of what you'll need from the hardware aisle.
  • Wooden or plastic mallet
  • Coping saw
  • Scratch Awl
  • Tack hammer and/or staple gun
  • Sharp pocket knife or woodcarving knife
  • Sandpaper
  • Care, patience, and a First Aid kit
Universal Caveat: If you're not sure how to use a tool, don'tFind someone knowledgeable to help or show you how. Keep all of your tools as sharp as possible. Be careful. Think twice, cut yourself not at all.

If you're really lucky, there's someone you can show a picture of what you want and have them come back in a few hours and hand it to you.
NOTE: None of this is terribly complicated. I was 13 when I learned most of this in a shop class at school. If dorky, awkward, 13-year-old Scottie can do this, you probably can too.

As always,
if I can think of an easier way to do anything, or find a shortcut for you, I will post it. Even if it's a link to what someone else did.


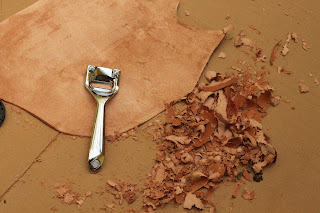
As far as leatherworking tools go, a lot of what you need you'll already have in your sewing kit. Even if you decide to tool any of the leather, a nailhead or anything can be used to make marks in the leather. Tools specifically to leatherworking can be expensive and if you're not going to use them again, you can skip them.


Yes, you can do leatherworking without buying stock in Tandy. There are some specialized tools that will make all of this easier if you have them, but they're not strictly necessary. You cannot, however, do it without buying leather. For that, you will need to find a local supplier or order it online. I encourage you to check online or in your local Yellow pages (remember those?) and see if you can find a local leather supplier. Most larger cities have them. Here in Seattle area, we have McPhereson's leather.

The leather used for all of these projects is "vegetable tanned" leather. That means the tanning process used tannins from natural vegetation to effect the tanning process. Some places sell it as "tooling leather" because it's perfect for these projects because it's non-toxic, easy to work with and takes tooling and shaping well.

NOTE: Leather is not sold by the yard. The price on the wall might tell you how much per square foot, but that doesn't mean you can buy one square foot of leather. Leather is sold as hides (whole animal) sides (half the animal), bellies (just the belly bits), and scrap. Scrap is usually sold by the pound.

At the moment, a mid-grade full hide (veggie tanned) will probably run you about $140 online. Many if not most of the projects here can be done with large scraps, so you might not need to buy an entire side.

If you want to do a lot this, it's more economical in the long run to buy the entire hide, but it's up to you and your budget.

Go ahead and select some dyes and a sealer as well while you're there. Tell the folks who work there what you plan to do and they'll advise you. Generally, anything that will touch food or your skin should probably be a non-toxic as possible, so pay attention to what's in the dyes you buy and think about how you'll use them.

To work the leather, you will need a couple of tools, some of which you'll already have:
  • A knife (I usually use a box knife)
  • An awl
  • A plastic spoon (yes, really)
  • Glover's needles (available at most leather or sewing stores)
  • Sinew or strong thread
  • A ruler.
Things you might want that will just make your life easier:
  • Skivving knife
  • Stitch-spacer

If you have those things, you're ready to start.

12 July 2011

Benched

Technically, I'm no longer a member of a guild at WMRF, in the parlance of this particular faire, I'm an  independent player. However; I still retain close ties with the guild I helped create, Hearth of Saint Brigid, and when they need set pieces or camp furniture, I'm always happy to help out.

For myriad reasons, this year they were facing the unpleasant choice of either bringing modern chairs and trying to disguise them or sitting on the ground. As an alternative, I offered to make them a pair of long benches and to take apart a table they already had to make it usable as a dining table. In the end, we decided the old table was far too heavy to do anything with (the previous carpenter was a bit too enthusiastic about heavy materials) and that two 8-foot benches would be less useful than four 4-foot benches.

There are a number of period images depicting people sitting on simple "five board benches" and the inestimable Karen Larsdatter has cataloged most of them (at least the ones available on the internet).  I had my pick of designs to choose from.

Five board benches are a standard of basic carpentry, so I was confident that they would knock together fairly quickly.

Since these would see heavy use and be used primarily outside, it was requested that I make them sturdy, so rather than the more typical 1X lumber, I chose to make them out of 2X stud lumber. This meant a bit more work to shape them, but the end result is a very sturdy piece of camp furniture that will weather any storm or any butt that comes along.


These are doweled together with hardwood dowels and once the trestles are complete, they will be stained a dark brown to make them look a bit more appropriate to the setting.  The tabletop will be given a matte polyurethane finish since it will be an eating and food-prep surface and the rest will be sealed with an eye toward minimizing shine.

This has been fun for me, if for no other reason than the fact that I've never tried to make a matched set of anything before. At least not out of wood. As is the case when trying to throw a set of mugs or goblets, getting them all to match without making them so plain as to be forgettable is the challenge here.

More pics when I have them stained and paired up with the new table.