Showing posts with label Stitches. Show all posts

12 May 2012

Leather Jerkin: Sewing & Seams Revisited

It is time to sew some leather. This project will be a combination of some machine stitching for the structural seams and then a lot of handwork to finish up the edges. 

When I first mentioned this project, I showed quite a few seam options and talked a bit about the unique concerns of sewing leather garments. Some of these problems are basically created by machine sewing, which is one reason I'll be doing so much handwork on this doublet.

One of the concerns of sewing leather that you don't run into with cloth very often is friction. Leather will build up friction against the bottom of the standard stainless steel sewing machine foot.
There are a couple of options for addressing this. One way I've seen work is silicone-impregnated "parchment" paper, sold in cooking stores. A few years ago, my wife bought me a foot that has been coated in Teflon. They're a bit spendy, but less fiddly than working with sheets of parchment.
WARNING: Not all machines are strong enough to sew leather. If yours is not, you can actually burn out the machine or strip the gears, so if you're at all unsure, I'd say you should handsew or find someone with an industrial machine they can loan you.

Stitches & Seams
There are two essential kinds of seam that I will be using on this project and they are not the ones I'd intended to use.

I was planning to make a lot of use of what I call the "Arnold" seam in honor of Janet Arnold, who wrote the book where I saw one the first time. In the Arnold seam -- which she documented for a couple of different extent leather garments -- has a piece of thinner leather sandwiched into a seam to protect the stitches from being rubbed or ripped apart.


When I started using that style on some of the test pieces as shown above, I was dissatisfied with the final effect. Instead, I will be using the lapped seam discussed earlier, and in lieu of the Arnold seam, I will use a felled seam which gives strength greater even than that of a lapped seam and also lends a structure to the garment akin to what you would get from light boning.
The felled seam is a simple enough concept.  Sewing right-sides together as you would any normal seam, cutting away one side and then folding over and sewing flat the remaining seam allowance to finish the seam.

The examples below were all sewn on the hotrod.


10 March 2012

A Leather Jerkin

Dear Readers: I will be traveling for a family emergency for the next couple of weeks. This is the project I planned to start this weekend; instead we'll be getting into it when I get home.  Take care, and I'll see you when I get back!  ~Scott

Youth's leather Jerkin, Museum of London. Detailed in 
Patterns of Fashion, 1560-1620 by Janet Arnold.
Next on my list of Things to Make is a leather jerkin. Doeskin, to be precise. It is quite probably the garment I've procrastinated most of anything I've ever contemplated doing ever.  Don't believe me? I bought the leather ten years ago.

This silly thing sorta scares the crap out of me for no reason at all. It's not that I've never sewn leather before. And it's not that I don't know how to make it. Honestly, I think it's the degree to which I coveted the leather jackets that all the cool kids were wearing back when I was a kid thanks to Top Gun and Indiana Jones, and the even greater degree to which my dad refused to let me buy one or buy one for me. They were too expensive. They were luxury items. Dad didn't hold with such things...

When I finally got one, they were no longer cool, but I treated it as if it had been made of bone china rather than one of the tougher materials known to man and had been beat to crap (aka "distressed") at the factory.

And it doesn't matter that I've owned dozens of leather coats since or that I've sewn sheaths and bags and purses and gloves and hats and masks and miscellaneous whatnot out of leather. Making a jacket just seems like a bridge further than I've ever been...

Then I did this to a perfectly good leather coat I picked up at a thrift store and the bloom came off the rose.  This new character is the perfect excuse to finally unroll those doe skins and make that stupid jerkin.

So let's talk about how.

The leather I'll be using is doe skin. That is to say the leather made from the hide of a female deer. This kind of leather acts a lot like cloth: you can run it through a sewing machine, sew it fairly easily by hand, and it stretches and drapes rather like a heavy wool.

Thread
I will be making mine almost entirely by hand, using a waxed linen thread. The natural linen thread shown in the picture is bookbinding thread. Pre-waxed thread can be found at leatherworking stores or online, or there's a brand of unwaxed linen thread called Londenderry that can be found in specialty embroidery stores in a variety of colors.


Needle
Working in leather like this will require a "glover's" needle, which has a beveled tip for punching through the leather. Thankfully, even the big box sewing stores seem to carry them.

Let's get into this right away...


Stitches & Seams
There are two essential kinds of seam that I will be using on this project.  Almost all of the stitches will either be saddle-stitch or running stitch. The seams will be the 'lapped' seam or a reinforced version of the standard pressed seam for reasons I'll get into in a minute.


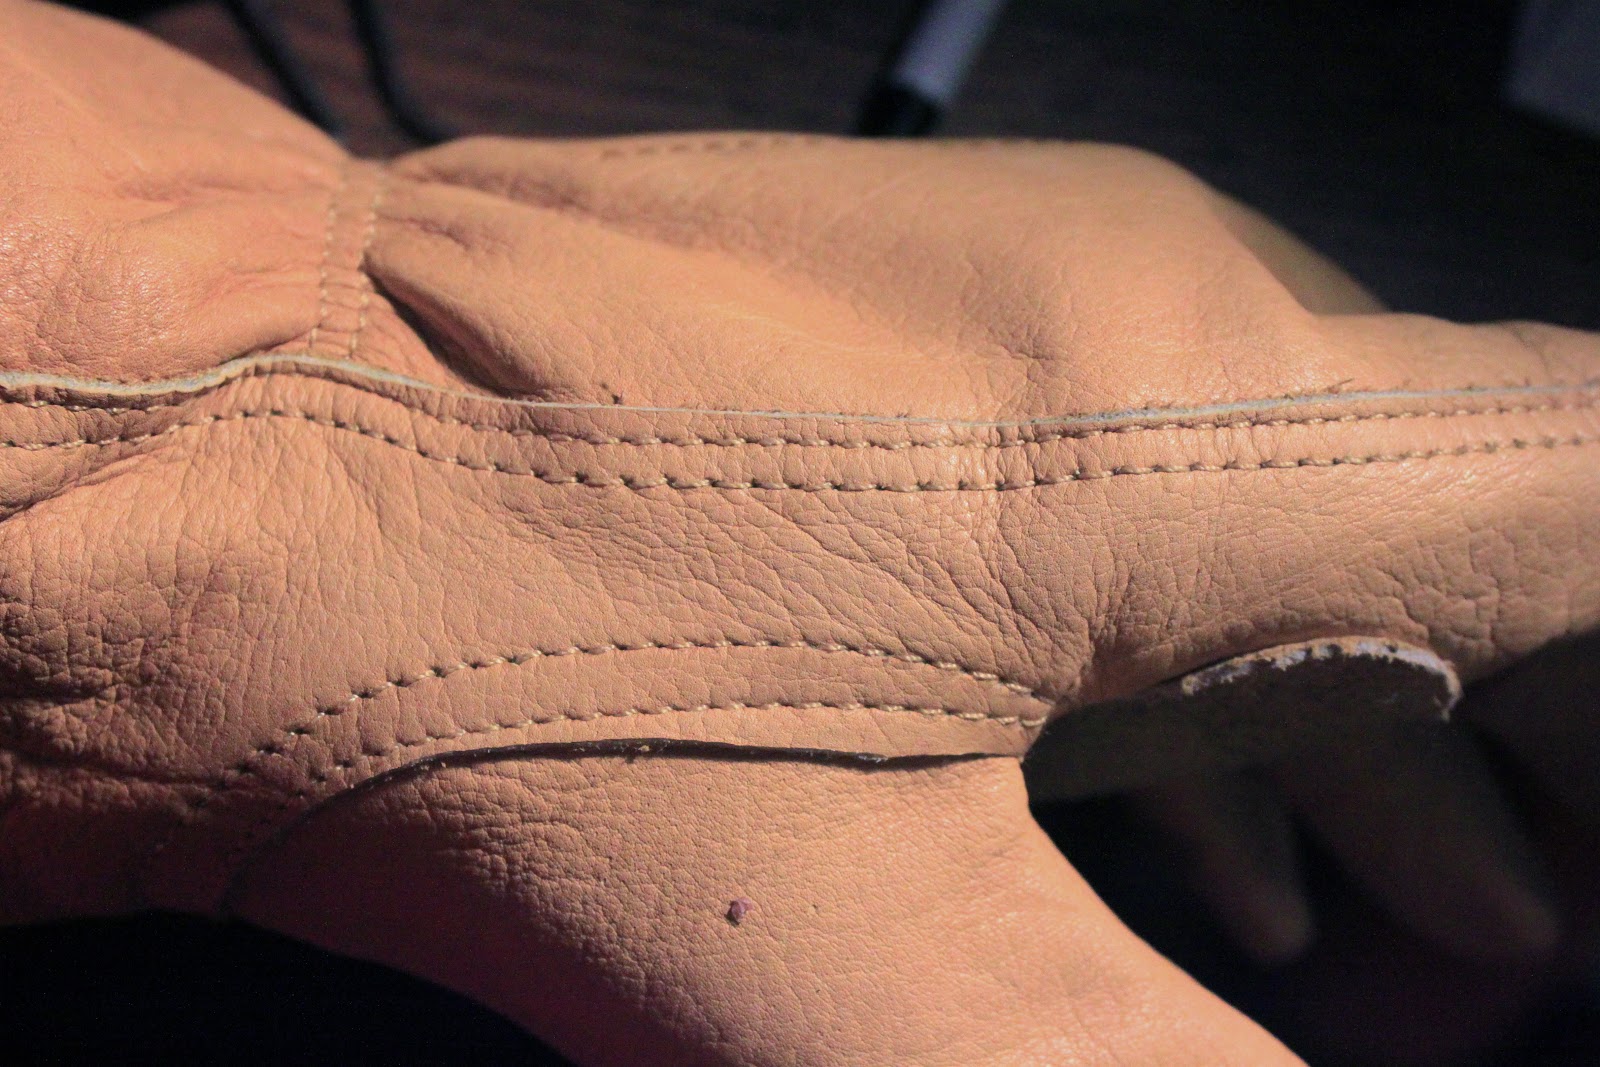
If you just lay two pieces of leather atop one another, right sides together, and then press the seams back as you would when working on a cloth garment, you're going to have problems. Where the needle has punctured the leather, you have created perforations (think the perforated 'Tear Hear' line on a document). And if you hold the seam up to the light, you'll see a 'ladder' of stitches which are exposed and weak.

The image above is a pair of doeskin workgloves I had handy. You can see the stitches of the seam at every fold and they never fail to fail at these points. This is a very unstable way to sew up a piece of leather.

When working leather, you need to work with larger stitches and use the right seam for the right task.


The "Arnold" Seam
As I said, you can't really just sew leather and iron the seams flat (actually, you usually pound them flat with a mallet) like you do cloth, and a French Seam is unworkable because of leather's bulk and stiffness. Even if you pare away the leather of the seam, you would end up with a standing seam that refused to lie down.  You could sew it down (a felled seam) or any one of a dozen other solutions, but I'm going to go with a period solution that I rather like.


The leather jerkin at the top of this post is in the Museum of London. If you click on the image, it should take you to some very large and detailed pictures at the museum's website. On that doublet, Janet Arnold noted that some of the seams had been sewn with a piece of lighter leather between them.

In the Museum of London jerkin, a much lighter piece of leather is doubled-over and inserted into the seam. Other seams documented by Janet Arnold use a similar approach and there are many that are reinforced on the inside with pieces of linen canvas. I will be doing that too.


Lapped Seam

One of the great things felt, felted wool, and leather have over woven cloth is that it doesn't fray. So you can do things like poke holes, make cuts, and do lap seams without worrying about it falling apart.

A lapped seam (shown left on the same pair of gloves as previous) is simply overlapping two pieces of leather and stitching the top one to the one underneath.  There are several different variations of the lapped seam and they appear in garments from the distant past to the jacket I have hanging next to the front door as I type this.

If you double-up the stitches as shown in the picture at the right, it makes an incredibly strong seam if you don't mind the stacked effect that results.  This is a great seam for long, flat sections like the seams of a jerkin or a doublet.

I will be using a combination of the lapped seam and the 'Arnold' seam to assemble this jerkin.


07 March 2012

Stitching Demo: Eyelet Engineering

Today, we're going to poke some holes in fabric and then we're going to reinforce the holes so that you can poke a bit of ribbon or cord through the hole repeatedly without tearing up the fabric.  There's a trick to this that makes it very similar to making button holes but also vastly different.

The difference is engineering.  

Yes, engineering. Go with me on this one.

The similarity is the stitch we're going to use. Depending upon whom you rely, this is either called the buttonhole stitch or the blanket stitch. The only difference between the two is whether the knot is at the top (away from the edge) or the bottom (on the edge). Call it by whatever name pleases you.

Since we're trying to make a hole and keep it open and fairly large, we're going to opt to not have the knot in the opening.

If you go to this website: The Wonderful Microworld you will find some beautiful pictures of various fabrics placed under a microscope. Most fabrics, at their basic structure, form a grid pattern, which is why I usually use plastic canvas for stitching demos.  The longitudinal threads are called 'warp' threads and the latitudinal threads are the 'weft'.

Because this demo will require me to move threads out the way, plastic canvas won't do it, so we're going to dig into the kitchen cupboard for some cheesecloth.  Cheesecloth is fantastic for this because it looks like a blown-up picture of a piece of fabric, so you will be able to see what's going on to a degree that a more densely-woven fabric would hide from you.


It also acts quite a bit differently than a more densely-woven fabri in many ways. It stretches and pulls and snags and otherwise fails to keep its shape without a bit of help.  You certainly wouldn't want to sew a doublet out of it. For the purposes of this demonstration, however, it will perform on a large scale just as a denser fabric will.

For making eyelets, the toolbox is pretty basic. You just need a long pointy thing like an awl. I got mine at the hardware store.  (Actually that's a lie; my wife bought it at the hardware store and I swiped it out of her sewing box. Don't tell her.) If you don't have an awl handy, just about anything will do: a knitting needle, a pencil, a chopstick, a sharpened dowel... you get the idea.


The reason we're going to study how to make them is because men's clothing in the 16th century required a lot of eyelets. And they have to be made strong and made correctly because they're going to be keeping your pants from falling down.


You're going to be making a lot of them, so get used to the idea.  Honestly, they're a lot simpler than button holes, but you'll be making a lot of those too.  If it makes you feel better, you can use the machine for the buttonholes if you feel the need.


I've never had much luck with machine-stitched eyelets. I advocate doing them by hand.


NOTE: We're going to be poking holes, not cutting them. Put away the hole punch and grab out the pointy things.

Why not use a holepunch? We cut buttonholes, after all. It would be a lot easier to make them whatever size I want if I can just cut a hole and sew around it. For an explanation, take a look at the professional, no expense spared, professional illustrations below.
A punched hole is surrounded on all sides by broken threads. 
Even metal reinforcement (grommets) will eventually pull out.
An eyelet can be pulled in any direction, unlike a buttonhole.
In a button hole, cutting the fabric will not compromise the integrity 
of the fabric.  When the fabric pulls left, the button (the red circle in the 
image above) holds fast and the stresses are borne by the uncut threads
perpendicular to the cut (highlighted in yellow).

See? I told you this was about engineering. Like anything you build, you want as many support structures intact as possible when you are done and as few as you can get away with.  In other words: thread good, grommets bad.

STEP ONE: Poke a hole
When poking your hole, work carefully, slowly, and breaking as few threads as possible.  The idea is to push the threads aside as best you can. Use steady pressure and twist as little as possible.


What you're striving for is what you see below: A hole with very few broken threads, where the threads have been pushed aside to make a very dense ring of compressed fabric around your hole. 

This reinforces the eyelet and makes it as strong as possible.


Remember that eyelets might be stressed in any direction, so you need them reinforced on all sides.


STEP TWO: Sewing
You're going to be making a buttonhole stitch just like we did the other day, only this time with the knot drawn away from the hole.
Begin by passing the needle through your hole and up through the fabric.  The point of the needle will always point away from the hole. 

Loop the thread over the needle and let it trail away, drawing the needle through the fabric so that the trailing thread makes a loop around your sewing thread.


Let the trailing thread form the loop.


Repeat this stitch all around the hole (these are exaggerated as always for the sake of clear photography) turning as you go, always drawing the thread out and away from the hole.


The finished product should look something like this.  


The knot is away from the hole, so it's not narrowing the aperture. The stitches are holding the warp and weft threads away without breaking them, so it's strong.

13 January 2012

Stitch demo: Handsewn Button Holes

There are several great demos already for making button holes. There's even a great one for making them in a period fashion by Jennifer Carlson.

But I want to make my own. Why? Because most of the ones I find are either done with thread on fabric (as Ms. Carlson did at the link above) or illustrations.  And that's not optimal for me. Illustrations rarely work to teach me anything and for photos, I need things biggie-sized a bit.

So out comes the plastic canvas and the yarn.

Because I'm me, that's why.

Some simple rules:

  • Always work toward the cut. This means that your needle points toward the cut edge of the button hole.
  • Use the thumb of your off-hand to hold a loop of the thread down so that the needle always passes in front of it. (see the pictures below)
  • Use the warp & weft of the fabric to keep your stitches evenly-aligned. Naturally this is easier with linens and even-weave fabrics and almost impossible with velvet. Do your best.
  • Practice practice practice.

Let's get started...

Cut a button hole first. 

With needle threaded, make a small stitch at one end. Either end will do, I prefer working left-to-right.

Poke your needle through the fabric and up through the cut, passing the thread behind the needle.

You will need to keep drawing the thread over like this to maintain tension and keep your knot at the cut edge as shown.

Do this repeatedly, using your off-hand thumb to keep the loop out of the way and to maintain tension on the knots.

When you reach the corner, just turn it around and keep going.

Work your way back across to the original edge of the button hole.
To create a bar along the side (as shown in many extent garments, many documented by Janet Arnold's "Patterns of Fashion") move from your final knot and make a stitch at the end of the first knot you made. Try to only bite as much fabric as you have been to keep things looking tidy.  Work across to the bottom of your stitches.

As you make the last stitch in your bar, pass the needle through the row of stitches to the other end of the button hole.
Work across that side and then tie it off.
Annnnnnnnnd you're done!

Now make a dozen more just like that.

A lot of people who are quite good at sewing gripe that they're not good at making button holes.  I am good at making button holes. Sure, it's monotonous, but what else are you doing with your hands as you watch television? 

Without any statistical basis or scientific investigation I feel that the reason most people aren't good at the finicky things is because they don't practice the finicky things. They say "Oh, I hate doing that" so they avoid doing it.

As with anything, we improve with practice.  If you want to get good at playing an instrument, or drawing, or sculpting, or riding a bike, you have to practice.  So to it is with stitching.

So grab some plastic canvas and sit down to a How I Met Your Mother marathon and make some buttonhold stitches.  You'll be glad you did.


22 March 2008

A Bone to Pick.... (Herringbone Stitch Demo)

The "Herringbone Stitch" is quite possibly the second most useful stitch in the book, right after the running stitch. It's used as a decorative embroidery stitch and a constuction stitch and sometimes both. The Herringbone's raison d'être is to join two pieces of fabric together in a manner in which allows them to lay flat, but may easily be parted when the need presents. This is why it's used so often for linings and hems


1.) Working left to right (if you're right-handed anyway, if you're a southpaw, do all of this backward, sorry.) start with a backstitch, down and up through the top fabric (white). Pull the thread diagonally to a position ahead of the starting point and make another stitch in the bottom fabric (black) returning to a point just in back of the starting knot...


2.) Pull your thread forward and up so that it forms an uneven "X", as shown, and take another bite of the top fabric (white), backstitching as before...


3.) Up and another "X", coming down to the bottom fabric and backstitch again...


4.) Repeat and repeat and repeat, keeping stitches even and thread tension consistant so that you form a row of little overlapping X's on one side...

5.) ...and a row of offset stitches on the obverse side. (NOTE: when you are stitching a lining into a doublet as I will be doing, these stitches do not show on the outside of the garment.)

This is what they look like - as applied to a garment - in this case, my Medici doublet...


Inside front. The button hole placket folded back and sewn to the lining.


Green damask collar lining joined to the body lining of the doublet.

05 March 2008

Collaring (Redux)


So... it's a few years on, and here I am, back at that finicky collar again. I just can't leave it alone. I was amused recently to read the notes for Margo Anderson's 'Gentleman's' doublet pattern and find that she too had the problem with the pucker and from her research so did the period tailor. I have no footnote for that last part, but it certainly makes me feel better!

It's the 'grown-on' collar (as the Tudor Tailor ladies call it) that is a collar cut-in-a-piece with the body pieces of the doublet (and frequently cussed-in-a-piece for good measure). My troubles last time I messed with this consarn thing led me back to my original source for this, The Tailor's Pattern Book by Juan de Alcega. Alcega pretty clearly lays out the pieces I've drafted for my doublets for years now. Front, side, back, curved sleeves and... wait a minute... a curved collar!? (far right, top row)

Odd. I've never noticed that before. Going back through the men's renaissance clothing patterns I have in my library, neither does anyone else. All of the patterns I've reviewed have the collars either entirely separate, or the front pieces are cut from straight rectangles...

So maybe that's the secret? It stands to reason that the off-square piece would be easier to ease into the curve of the neck and account for issues as they crop up.

Final Thoughts Before Sewing...
  1. I decided to go with the patterned white velvet I showed a picture of earlier. I liked it better than any of the others I looked at.
  2. I did an informal pole on one of the costuming sites over at Tribe.net and overwhelmingly people expressed a preference for hand-sewing only when it would be glaringly obvious if it wasn't or they couldn't avoid it. So for the record, I'm aiming for the happy meeting between hidden machine stitching and visible hand-stitching.
  3. I'm going to figure out that damn collar or I'm gonna quit show business.

So it begins...

Using the hotrod, the body of the doublet goes together quickly... all nice long seams.

After messing with this &$@% cotton velvet for a bit I came to the realization that I was going to need to reinforce some of the seams that bear the greatest amount of stress. Janet Arnold, thankfully, shows this practice in many of the garments she examined. Some of them look rather like patchwork quilts on the inside with all the padding, reinforcing tapes, et al. Here's a glimpse of what that looks like...

This is the inside of the shoulder seam with the lining herringbone stitched into place. The canvas will not only reinforce the seam, but also help stiffen the collar.

Speaking of collars, I cut my two front pieces and they are decidedly un-square. With two layers of cotton batting padstitched into place, I'm ready to give it a go...


This is the first fitting, with Tigger doing the honors. (Kristin was using her dress dummy, what can I say? I improvised.)


When I'm wearing it (instead of the Tigger), the pucker isn't there either... well, mostly. By cutting the collar off-square, and indeed curving the piece - at least a little - I had more going for me as I eased the piece into the body of the doublet.

As you can see, there's some residual pull across the back of the neck in the picture below, but a bit more tailoring on the next one and I'm there.


It's almost time to get down to hand-sewing and our next hand-stitch... the Herringbone.

26 February 2008

Pad-stitching (With Demo)

The stitch at the top of the list of stitches I don't usually use but should has to be the pad-stitch.

If you have been with me for awhile, you'll remember the jerkin I made with the quilted collar and all of the fussing I did with that collar to get it to work. I cannot tell you how much better that garment would have turned out had I used the pad stitch to arrive at the effect I wanted instead of machine stitching the thing... well actually I can tell you, or at least I'm going to try.

What is a Pad Stitch?
The Pad Stitch is a method of bonding several layers together - without applying adhesives - into a single unit so that they move as one piece and are stiffer than they would be individually.

That's a long, technical, way of going about saying that this is the period method we imitate with fusible interfacing. The pad stitch can bond as many layers as you like together in such a way as they will move as if it's one thick piece of cloth. Janet Arnold notes one such application in a period doublet in which the collar bears "striped wool pad-stitched over two layers of linen, and another layer of wool." This is just the stiffening layers for this collar and does not include the outer fabric, interlining or silk lining! Now that's a collar that's not about to flop around in a breeze!

Pad-stitching is a simple zig-zag stitch. Essentially you're making "Z's" with the diagonal on the front and the horizontal arms underneath, connecting them, like you see in the image above or the illustration at the right (click for a larger image).

The pad-stitch can be used anytime there are multiple layers of fabric to be bonded together and can even create a quilted look if applied correctly. Had I pad-stitched the collar of the aforementioned jerkin, there would not have been as much loss of girth and I probably would not have encountered some of the issues that I had to cope with.

Why Bother?
Even if you machine-stitch the whole garment, pad-stitch the collar and belly by hand. The stitch tension is infinitely easier to maintain and the final effect smoother if you're in full control of the thread with every stitch, varying it as the sewing demands. No machine I've ever encountered can do that... not even the Hot Rod.

As you can see in the orange doublet (left) I blogged about awhile back, the straight channeled stitches pull the fabric down into a 'ditch'. This is fine on a flat quilt because quilters know to account for this 'shrink' as each successive line of stitches pulls the fabric across the entirety of the quilt and accounts for a 'loss' of several inches of fabric on a side. Quilted garments made in this fashion did exist (hand-quilted, of course), but the stitches were comparatively loose and the garment oversized to compensate for the rate of shrinkage.

Pad-stitching the same part of the same garment would have drawn in less fabric, thereby creating less shrinkage problems and been appreciably more period in its final effect. These stitches are normally hidden in the inner workings of your doublet, but the 'back' of the stitch can also surface to create the quilted effect, as Janet Arnold noted on the collar of the 'Nils Sture' leather doublet and as you can see on the garment to the right. (click for larger image)

Tudor Tailor, Margot Anderson and many other pattern makers and books on costuming covering the 15th and 16th centuries advise using a natural cotton quilt batting to stiffen collars, peplum, and fill out the bellies of peascod doublets. This is what I tend to do. You can resort to period stiffeners if you want. As I mentioned, Janet Arnold specifically notes the prevalence of multiple layers of wool, linen and buckram in the extent period garments she analyzed for her seminal work Patterns of Fashion. That's all well & good for you, but it sounds a little too hot since I mostly wear these garments in August. One layer of cotton batting breaths a mite better than multiple layers of wool.

Where should you use it?
As I already mentioned, the collar and the belly are the two most common places you will find padding and therefore the pad-stitch. That being said, it can be used just about anywhere that two or more layers of fabric need to be bonded so as to move without hindering one another. Another common area is the back, and I tend to add a stiffening layer in the belly region even if I'm not padding it out peascod-style.


How do you do it?I haven't done a demo in awhile, so I thought this might be a good time and a good subject for me to begin again with...

As I said, and as you can see from the illustration up above, it's pretty much a simple matter of even zig-zags in parallel rows up and down the garment, each penetrating only deep enough to catch the next layer.

For this demo, I used plastic canvas in two different colours to better differentiate the layers, and substituted red yarn for the thread to make certain the images are clear. The only difference between what you see me doing here and what you will be doing on your garment is the regularity of the holes in the plastic. As with any handstitchery you do (outside of embroider on even-weave linen) you won't be able to count holes to keep your stitches nice and even.


Start your first stitch by making a "Z" with the top and foot of the
letter on the back and only the diagonal showing on the front.


Continue down the row as far as the size of your fabric or your
desired design allows or calls for. (Notice how when I hold it up
to the light that you can see the full zigzag? This is what you
want to see.)


End each row with a long horizontal stitch, bringing you in line
with your next row. Some people like to work these so that the
diagonals form chevrons. It doesn't make any difference unless
someone's going to be able to see it.


If you're going to make your stitches visible from the outside of the
garment as on the collar above, you should practice making the
back as even and careful as the front. I confess that when these
stitches will be hidden I don't spend a lot of time sweating such things.


The end result is two pieces of fabric that move as one.
Nice even stitches in parallel rows will bond the fabric together
until it moves as one unit, as you can see above.


NOTE: If you're doing a piece that will have a permanent curve on the final, you can further eliminate wrinkling and shrinkage from 'quilting' by working the piece over a curved surface: your knee, a bolster, a rolling pin or whatever maintains the desired curve as you're working. I've even appropriated a kitchen cannister before to act as a stand-in for my neck. A smooth final product is the desired result, use whatever you need to achieve the best possible result!
Fair warning... This activity is known to attract onlookers!

Good luck!
- Scott