Showing posts with label tips. Show all posts

13 May 2012

Leather Jerkin: Pinking & Slashing

Our German friend to the left there is probably responsible for the fashion for slashing and cutting panes into garments in the 16th century.  Costume historians tell us that the flamboyant outfits of the German Landsknecht originated in the tattered garments of the battlefield and the booty. Very quickly, those slashed and draped fabrics became quite stylized as you can see from our fashionable friend, illustrated by Jost Ammon.

The fashion reached its high point in flamboyancy in the late 15th and early 16th centuries, as Teutonic mercenary legions carried their taste for stylish rags across the continent.  By the late 16th century, which is my preferred period for costuming, things had died back quite a bit and the pinks and slashes tended to be smaller, but made up for it in volume.

The leather jerkin I am making is not an exact replica of a painting or extent garment. Though it is inspired by the one at the Museum of London that first inspired me to imagine I might want to wear a leather vest in the August heat.  That garment is pinked with shaped punches to form a Lucky Charm cornucopia of hearts, stars, and diamonds. It's quite a whimsical garment, and if memory serves, Janet Arnold opined that it was meant for a child, a page in Queen Elizabeth's retinue.

Garb Carpenter

I don't have any punches with whimsical shape, nor do I have the time or inclination to make some. For those interested, I am told that Tandy leathercraft now sells punches in the shapes you would need for making the Museum of London jerkin.  Instead, I will be using assorted sizes of round punch and a nice sharp set of cheap bench chisels that I wouldn't want to use for woodworking, but are ideal for cutting leather.

If you want to do this at an event, the chisels used in the 16th century for this are pictured in Queen Elizabeth's Wardrobe Unlocked and a replica set in the back of The Tudor Tailor. I would link to someone currently making them, but I can't find anyone and all the leads I get take me to sites for blacksmiths who are no longer in business.  Apparently not much demand for these things.

The chisels I'm using came in a cheap set that I picked up from Harbor Freight. They're not what I'd choose to use for a woodworking project; they're okay steel but not great.  They do, however, hold an edge well enough to cut leather if you take care of them and keep them sharp.

If your chisels aren't sharp and you don't know how to sharpen them, take the time to learn to do it properly. You will be glad you did.
FAIR WARNING: Do not use a steel tool on damp leather. Make sure both are dry or the iron in the chisel will stain the leather black. Ever wonder why black leather was so prevalent for so much of history? That's why. Put it in an iron-oxide bath and your leather will be black before you know it.  This is why leather stamps tend to be coated or made out of stainless steel.
There's not a lot to say about this, so here are some pictures...


There's not a lot to say about this process other than to show you some pictures.


This picture gives a good idea of the size of the slashes. Also dispels any notion you might have that I'm a manicure sort of guy...
After examining as much as I could of some period ones, I didn't want it to look too precise. I marked the larger holes 3/4 inch apart, and marked one edge of each slash, one inch apart, then free-handed the rest of the holes and the angle of each chevron. So there's a bit of variation in each.

I decided to eyeball the chevrons to keep things from looking too staid and mechanical.

A decent set of hole punches is worth its weight in gold when you're doing this.

This is the back of the jerkin, almost done.
On the youth's jerkin at the Museum of London, Janet Arnold opined that the diamonds of holes at the back of the neck were intended to increase the pliability of the leather.  It certainly does that, but not so much that I'm inclined to think she was right. There are easier and better ways to make thick leather bend where you want it to, mostly by thinning it, which is considerably less work that this was. Honestly, I think it was decorative and the pliability thing was a nice bonus.

It is pretty, though...


12 May 2012

Leather Jerkin: Sewing & Seams Revisited

It is time to sew some leather. This project will be a combination of some machine stitching for the structural seams and then a lot of handwork to finish up the edges. 

When I first mentioned this project, I showed quite a few seam options and talked a bit about the unique concerns of sewing leather garments. Some of these problems are basically created by machine sewing, which is one reason I'll be doing so much handwork on this doublet.

One of the concerns of sewing leather that you don't run into with cloth very often is friction. Leather will build up friction against the bottom of the standard stainless steel sewing machine foot.
There are a couple of options for addressing this. One way I've seen work is silicone-impregnated "parchment" paper, sold in cooking stores. A few years ago, my wife bought me a foot that has been coated in Teflon. They're a bit spendy, but less fiddly than working with sheets of parchment.
WARNING: Not all machines are strong enough to sew leather. If yours is not, you can actually burn out the machine or strip the gears, so if you're at all unsure, I'd say you should handsew or find someone with an industrial machine they can loan you.

Stitches & Seams
There are two essential kinds of seam that I will be using on this project and they are not the ones I'd intended to use.

I was planning to make a lot of use of what I call the "Arnold" seam in honor of Janet Arnold, who wrote the book where I saw one the first time. In the Arnold seam -- which she documented for a couple of different extent leather garments -- has a piece of thinner leather sandwiched into a seam to protect the stitches from being rubbed or ripped apart.


When I started using that style on some of the test pieces as shown above, I was dissatisfied with the final effect. Instead, I will be using the lapped seam discussed earlier, and in lieu of the Arnold seam, I will use a felled seam which gives strength greater even than that of a lapped seam and also lends a structure to the garment akin to what you would get from light boning.
The felled seam is a simple enough concept.  Sewing right-sides together as you would any normal seam, cutting away one side and then folding over and sewing flat the remaining seam allowance to finish the seam.

The examples below were all sewn on the hotrod.


11 May 2012

Leather jerkin: Pattern layout & Preparation

Today, I finally get off my duff and begin my leather jerkin project...

Patterning, Plotting, and Planning:Orienting pattern pieces on a piece of cloth is fairly straightforward. Cloth is woven with a definite grid of warp and weft fibers, so you know what you're going to get. Stretch on a piece of cloth runs on the diagonal (bias) because the fibers slide more easily diagonally than they do laterally.

Because leather was once the skin of an animal, it has its own concerns where placement of pattern pieces are concerned. Leather has a lot of give to it and while there are definitely directions in which the leather stretches better than in other directions, those are not necessarily uniform across the entire hide. As discussed in the posts on mask making, the areas nearest the belly of the animal are the stretchiest.

Alcega's doublet pattern layout on a rather narrow width of cloth.

There are a lot of other factors that play into these considerations, including the origin of the leather (cow or calf, sheep or lamb, deer or doe... etcetera.) Breed, gender, and age are huge considerations in choosing leather. Female and/or younger animals have suppler hides because their skin is higher in collagen, same as my skin is not as supple as a lad half my age. Even on leathers from the same animal, how the leather was tanned will be another consideration.

This is all compounded by the fact that unlike the cloth that comes from your local weaver, leather thickness is not uniform across the whole of the hide. So pattern pieces should be oriented so that the thinner places are along the outer edges where you were going to have to skive away leather anyway.

Pattern Placement and Cutting:
Holes you make in the leather won't 'heal' like they do in cloth. So we can't really use pins. I know some folks use them in the seam allowance, but I don't like to do so. If you feel that you cannot get by without some pins, then to the seam allowances with you!

I lay the pattern pieces on the back side of the leather and either tape them or weight them down and trace around them.


Note the way I oriented the pattern pieces in the photo above, taking the most advantage of areas of leather free of things like bullet holes and other imperfections. Unless you have in your project budget to buy multiple five-star hides and use the best of each, some imperfections are par for the course. They add character as far as I'm concerned.

Also, note how the stretchier areas at the edges are kept to the areas that will need to be stretchier and/or thinner on the final garment.

Stabilizing the Leather:
There are ways to get leather to be more stable as a final garment and I'm going to use a flat lining technique with a slightly... okay, very modern twist.

Once upon a time, I bought a leather sport coat at a thrift store and took it apart to use the leather for something else. I was surprised to discover that across the whole of the garment, the leather had been glued to a piece of lightweight interfacing.

The interfacing peeled right off, as pellon is wont to do when thumbnail is applied, but it was a bit of an "Aha!" moment for me.

A jerkin needs to be a fairly structural garment, even if made from a lighter leather. Because I'm using a very stretchy skin, I plan to adhere my leather to a denim-weight canvas using a spray adhesive. This will bond the two together so that I can treat it as one layer. This adhesion will be backed up with stitches later, but the adhesive allows me to work with it fairly roughly (note that I've used a chisel to slash one of the test bits below.)


You can use almost anything for this from lightweight pellon to a cheaper hide if you want. It all depends upon how much structure you want or need to lend your final garment.

The final pieces. Cut out and stabilized.


Is this a period technique?
Well, 3M was founded in 1902 and probably didn't start making aerosol adhesives until the 1950's at a guess.

Flatlining certainly is. Using layers of fabric to reinforce and stiffen areas of cloth and leather garments, certainly. Gluing it on?  I don't really know. 

If you wanted a more period-appropriate method, do the same thing with linen or hemp canvas, adhered with hide glue. It would accomplish much the same thing, but hide glue is messy and much stiffer than the 3M spray product I used here. Which is why I opt for the modern convenience.

The adhesion provided by the glue will allow the two pieces to move as one, each lending the other its greatest strength. The denim lends the leather body and the leather (and the glue) keep the denim from fraying out too much where I've slashed it.

I'll talk more about pinking and slashing in another post.

16 July 2009

These Truths I Hold To Be Self-Evident... Redux

Since we began our journey back in October of 2005 (a bit earlier for me, but that's when you joined me on the road) my feelings on several aspects of this art & craft have changed. The five central tenets of my costuming mantra have not... let us review:

1. Good garb feels natural when you’re wearing it.
2. Good garb won’t kill you to wear in the August heat.
3. Good garb is clothing you won’t hate putting on in the morning.
4. Good garb is just as durable as the other clothes in your closet (or better).
5. Good garb weighs style against wearability and strikes a healthy balance.

Over the years, I've added a few addendae to support and expand-upon the central philosphy...

Nomenclature: I like the word "Garb" and use it in part to differentiate between my everyday street clothes and what I make for reenactment and/or faire. Another period-correct word offered up by the venerable OED is "Duds". I use both, but mostly I call it 'garb' or 'clothing'. I generally shy away from "costume" because I don't like the immediate association with Halloween despite its literal definition.

Handsewing: I made this doublet entirely by hand so it's not a question of ability it's a matter of the best-application of a finite resource: time. I actually like handsewing now that I've accustomed my hand to it. But I lack the time for such efforts. So I will use handsewing when it suits my whims or if it would be too obvious otherwise. Long or turned seams usually go under the frantic needle of the hotrod.

Period Perfection: All of the clothing I make is based upon historical paintings and patterns (where possible). Unlike many who perspire over handsewing and 100% period fabrics, I tend to focus more on the overall “feel” and the correct “look” of a garment. This makes me a heretic in some circles. I am comfortable with that.

Garb Engineering: My wife is an engineer. Certain terms have bled into my sewing vernacular, like "Prototype" and "Beta Test".

All of the clothing I make is Action Garb.

If I could have one overall effect on the historical costuming community, it would be this: The items we are making were the everyday clothing of the people in the historical era we are portraying. (That's tenets #1 & 4 if you're playing along at home.)

People lived in the stuff we're imitating here. The chased lovers (and were chased by lovers if they were lucky), coddled children, fenced, swung from chandeliers, quaffed ales, guffawed hearty guffaws and generally lived full active lives in their clothes... their garb. Sometimes I think we forget that in our blind pursuit of what we allege to be 'period perfection'. It is possible to "be period" and be comfortable at the same time. Even in nobles. What good is garb that looks fabulous, is made of expensive period materials, and is as uncomfortable as the Iron Maiden? If you can't feed yourself, looking pretty won't do you any good. (We lose more nobles that way)

The best advice I can think of is... Don't fret so damn much. This is supposed to be fun. Attain the look. Make it wearable. Make it comfortable. Don't stay up nights worrying about it.

A thousand “Garb Snarks” just began gnashing their teeth as I wrote that, but it’s how I truly feel. (And stop that. It's bad for your teeth!)

Scott

27 July 2007

Buttoning Up - Part One


There are three methods of making your own period buttons that I am going to discuss.
  1. Soft Buttons made from fabric scraps
  2. Thread-covered buttons with a wooden core
  3. Buttons fashioned from beads
I rather like the idea of making soft buttons. As I mentioned previously, Alcega and other renaissance tailor's books go to some length to show you how to lay out your pattern to utilize as much of the yardage as possible. Some of these layouts have pieces lying with, across and diagonal to the grain of the fabric. While I cannot imagine going to quite that great a length, in threads that unraveled from the edges of the cloth! On this project I have taken every opportunity to reduce waste, reuse scraps, and recycle even the little end bits of thread left over from hemming and gathering. Reduce, Reuse, Recycle... a very sixteenth century idea wedged into a twenty-first century framework.

Of all the buttons I've experimented with, this is by far the easiest to master and the quickest to make. All it takes is a little practice (which is a lie, I fooled around with this for quite awhile before I consistently got spheres) some basic stitches and scraps of your "fashion" fabric!

Please note: There are many places to learn to do this. Tudor Tailor has some instructions, as does the fantastic Renaissance Tailor website. Both are illustrated and both contributed in some fashion to me learning how to do this prior to posting this tutorial here. I'm putting this up not because it's never been done elsewhere, but because no one I've found has done this with actual step-by-step photos and even though illustrations are helpful, I've always found it more comforting undertaking something new to see it laid out in actual pictures. Keep in mind that I'm a trained illustrator when you read that. So here we go...

One

If you're using a light fabric such as the linen I used on this doublet or even a light woolen, cut the fabric into squares approximately one inch wide. The Tudor Tailor advises using the bottom of a thread spool as a guide, but considering that there no longer seems to be a standard size for this, I came up with the dimension of one inch as making a finished size and firmness that I'm happy with.


NOTE: when using a heavier fabric, such as canvas or even a wool flannel for this, you might want to nip off the edges and make a circle as shown below or it'll be too bulky later when the time comes to stuff it.


Two
Using a piece of thread roughly a foot long (you want a little extra) run a circle of stitches around the center of the square as shown above. Keep the stitches as even as possible and keep in mind that you're going to be using these to gather the fabric into a ball, so don't make them too tight or they'll do you little good when the time comes.


ThreeDraw up the gathering stitches until the square looks like a little bag. Don't pull it tight, though until you...

Four
...stuff the corners and edges inside. Then draw it as tight as you can without tearing or distorting the fabric. (I imagine great care would be needed if working with silk) Take the remaining tail of thread and sew some stay stitches into the resulting ball to keep it in a ball shape.

Five
Working from the bottom (the wrinkly bit) sew back and forth across the axis of the ball three times, leaving the stitches loose, forming a loop which will be used to secure the button to your garment. Gather the three into a single strand and go over them using a button hole stitch as shown below.

Six
Repeat as often as necessary and sew them on...


20 October 2006

Doublet Deux

Getting back on track...

When last we left our intrepid seamstre… um, tailor, he was endeavoring to draft a new pattern (ignoring for the moment all of the side projects like the marrionette…) which took into account the shortcomings of the old, and create a new doublet to his liking that can go on to form the moderating and contrasting base for a more flamboyant jerkin which shall overlay. Are you with me now?

NOTE: Plum color for mockup purposes only.
See previous post for tips on mocking-up...

As you may recall, the color scheme here is autumnal in nature, drawing from my favorite earthtones of rust and mustard (thankfully I’m making garb and not sandwiches, but I digress). The colors were inspired by my favorite set of juggling balls, I kid you not. There’s a picture back in an earlier post if you want to take a look. We find inspiration where'er it hides. Unlike the earlier jerkin project, which incorporated a number of techniques and ideas that were new to me, I have a good deal more experience making doublets and even my past noble projects have followed simpler lines, as I generally believe in letting carefully-chosen textured fabrics speak for themselves. I think that this lends a certain nuance to costuming that helps in bringing me down on my preferred side of the dividing line between my character’s everyday clothing and a costume worn for a weekend and meant to last only that long.

TODAY'S TIP... Draw inspiration from what you've done. This includes acknowledging and mending past errors, and distilling the best bits from the last few projects to make the newest project a culmination of all you've learnt so far.

Above is a photo of me looking pompous in an early noble costume of mine. If you’ve read some of my older posts, you’ve likely seen it before in the parrot picture. I like the quilted fabric and the simple lines of the doublet. I need to dig it out and take some more detailed shots ere we discuss shoulder and waist treatments, because I was particularly fond of this one. Small ½ inch loops of match-dyed cotton are sewn into the seams of the waist and shoulders as well as around the collar with the intent of eventually forming a supportasse for a ruff I never quite got around to making.
PRO: Good use of texture, simple lines
CON: Button placket, never made ruff so the collar just came off as a little silly


Below are some shots of another doublet o’ mine that I am particularly fond of. The cotton canvas is a sage green (much faded by the suns of a dozen faires) of very much the same weight as the rust-colored stuff I used for the jerkin project. I like the heavy open-weave texture of it and the way it turns supple with time and wear. I even like the way it fades, though this doublet started out solidly middle class and has degraded somewhat with wear to a lower middle class garment. But that’s part of its charm, methinks.

PRO: Simple lines, very workmanlike and utilitarian, love the pewter buttons (difficult to see in the picture), Best fitting of all my doublets so far.
CON: Fit might belie the doublet's class somewhat, has a button placket

A SIDENOTE ON THE SUBJECT OF FITTING… I am a slender fellow. The name “Ichabod Crane” leaps to mind when I flounder about for a literary reference to describe myself. As such, I oft-times find it difficult to draft all the wrinkly bits and pudgy bits out of my doublets. This used to drive me to destraction until I started to look, and I mean really LOOK at the renaissance portraiture, especially that of senor Moroni. I have been especially inspired (as are many male costumers) by the cut of the Tailor’s doublet and the places in which Moroni recorded the folds and buckling of the fabric in the man’s pinked and slashed white doublet. Many of these ‘faults’ are the very same ones I’ve been tearing my hair out trying to correct for years. And that guy was a tailor, for heaven’s sake! Many of his other paintings bear this out, as do many other painters of the period. Many of the perfect flat front garments in Northern Renaissance paintings were clearly boned or starched when they weren’t stuffed into unrealistically taut potbellies by adding sewn-in bags of cornmeal or the like.

The doublet in the inspiration picture (derived from a painting by mannerist master Moroni) doesn’t lend us much of a clue as to the cut of the man’s doublet other than that spiffy sleeve which is either cutte or tightly paned (I've seen it duplicated both ways with some success) which I am not currently planning to replicate… at least not right away. Other than the color, it is difficult to deduce much at all about the inner garments. The hang of the outer garment suggest that the doublet would be close-cut rather than stuffed with bombast in the peas cod style, more akin to a soldier’s arming jerkin meant to be worn beneath cuirasses. The body of the doublet might not have matched the fancy sleeves and I would be remiss if I failed to point out that I can by no means be certain that there even was an inner garment between the visible Jerkin with sleeves and his shirt. So I am - by necessity - going to operate under certain assumptions.
  1. The inner garment is a separate piece from the outer jerkin.
  2. The inner garment is a close-fitted doublet of a lighter fabric than the outer and is all of a piece.
I’m not even going to dwell on whether that’s really the collar of his shirt that we see or a renaissance dickie like many of the ladies of the courts wore and called a partlet. Partlet, dickie, you say to-may-to, I say to-mah-to…yada yada yada…

We have already drafted a new pattern for the proposed inner doublet and revisited the previous projects of pertinence to the current endeavor and recapped for those just joining in. Welcome and welcome back all of you…


For the inner doublet I have chosen a lightweight brushed cotton, almost a light flannel in a wonderfully understated mustard color. The buttons will be wooden beads and the shoulder, neck and waist shall be decorated only with a pinked strip of folded bias binding in a matching color as shown in the previous jerkin around the neck and in numerous garments featured in Janet Arnold’s Patterns of Fashion. With the help of my dear ladywife, I have (hopefully) drafted away the annoying wrinkle at the back of the neck and I will once again be using an overlap instead of a button placket for the closure.

Next... assembly.

14 November 2005

Mustard Doublets & Eggplant Mockups

Almost sounds like I'm making a salad, doesn't it?

Feline emergencies have subsided. We even gave Figaro his final pill last night! So I took advantage of the quiet to do some quick sewing. The sleevelets are on the jerkin, I nipped the trim around the collar, tucked in loose ends, and did the 'clean up' stitching that I always find necessary at this stage of any project. The jerkin's to the point where I need to make the doublet before I sew on the buttons and whatnot.

My poor battered old gorget isn't really a part of this costume.
I put it on there to 'frame' the collar
(because I thought
it made a better picture)

Tossed over the dress dummy.
It really isn't this wrinkly normally.

I know, I know. I said I was going to be doing the buttons and buttonholes next. However, button holes are a pain to sew by hand (they never come out right on the machine) but they get easier after about ten or so when I find my stride. To wit: it will be easier to accomplish if I do the buttonholes for both the jerkin and the doublet at the same time.

So... on to the doublet!

As you might recall, the doublet will be a mustard color with a butterscotch lining. The lines will be very simple with no epaulets or peplum and a light adornment with simple embroidery stitches used sparingly.

Beginner Tips: "Mocking Up"I skipped this step with the jerkin, taking it on faith that the twelve doublets and jerkins I've made using variations of this same pattern would stand up to any difficulties I might face. Little did I anticipate collar problems. My mistake.
I want to modify the pattern slightly (again) to try to incorporate some of what I learned making the jerkin's collar. (No, this one won't be quilted, but still...) So - since I learn from my mistakes - I will be making a quick mockup out of some extra fabric we have lying around.

For the record:
I hate prototyping something in muslin when the final fabric won't be muslin weight. It's a rule with me. It just doesn't make sense to me to expect a muslin mockup to fit the same as a final piece when the final will be of a heavier denier fabric!! It's a little more expensive to use heavier fabric for these prototypes (called 'Toile' in period, I believe) but it pays off in stress-reduction in the long run.
A few years ago we wound up with an abundance of eggplant-colored denim from a clearance table. So I'll be making an eggplant-colored prototype which I may or may not finish into a final completed piece. (It looks violet, but believe me, it's really eggplant).


I will be splitting the back seam rather than cutting it out as a single piece. This should allow some shaping and better control of the silhouette. As the outter garment, the jerkin doesn't need to have as much form, but the doublet will be a simpler machine - so to speak - so the tailoring must speak for itself.

12 November 2005

Irony, thy name is Cat


I went to great lengths a few days ago telling ya'll to watch their kitties while they're sewing. (I was born in Missouri, I have every right to use the word "ya'll" thank you very much) The title of the tip was "Cats Can't Spit" which is true: if a kitty gets a strand of embroidery floss or thread caught in his mouth, he can't get rid of it. The backward facing hairs on his tongue which make it ideal for grooming are death-dealers when they catch on something he'd rather not swallow. Much as he tries to work them out, the hairs pull them in. (Here's the ironic part) Ever tried to give a cat a pill? Oh they can spit alright! If it's medicine, they can launch it into next Tuesday and bite you in the process.

Every night as we're trying to force a pill down Figaro's throat I am haunted by the words 'Cats Can't Spit'.

God has a strange sense of humor.
Sigh.

19 October 2005

Quilting addendum...

That which goes without saying is often that which most needs to be said. Or that's the gist of what my wife just said to me after reading last night's post. She rightly pointed out that while adding two inches all around before quilting is well and good, I neglected to mention that after quilting, you trim away a good deal of those extra inches to get your quilted piece back to the correct size for the pattern piece.

I guess she was picturing that oversite on my little blog here starting a wave of John Travolta Saturday Night Fever doublets made from white polyester with huge honkin' quilted butterfly collars.

"You can tell by the way I move and the way I walk,
I'm a renaissance man, and no time to..." Oh, forget it.

So yes, the Tip Of the Day is: Please trim away the excess after you're done quilting. Big collars are scary. Only you can prevent renaissance liesure suits!

Sigh

15 October 2005

Beginner's Garb Tips

One of the reasons I decided to do this 'doublet Diary" was because when I got started there wasn't much out there geared toward gettign a fellow started. That included some of the basic stuff like pattern drafting and the like. So, I will periodically be posting "Tips O' The Moment" for the newbie garbmongers among us. The rest of you can skip these posts if you like or laugh at the way I do things.

Here's the facts... despite certain key similarities, we all tend to take slightly different paths to arrive at roughly the same destination. That is to say: This is how I do it, I'm not an expert, just experienced. Do it my way, don't do it my way, it's your choice. The success or failure of your sewing project is in your hands. I'll tell you my route to the summit but you have to climb the mountain yourself.

Enough metaphors! Let's sew!


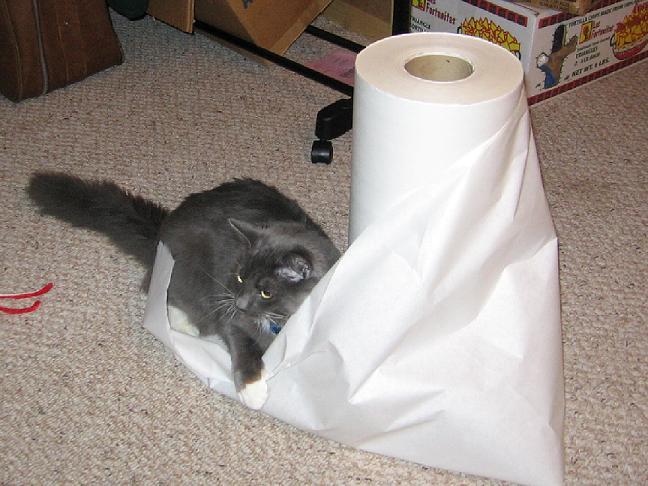
TIP 1: That's not a big roll of toilet paper or a really small kitten. It's my eleven pound 6-month-old kitten Dusty illustrating the rough size of a roll of butcher paper I picked up at my local Costco warehouse store. If you don't have a Costco, go to Sam's Club or Pace or whatever. Odds are they sell this stuff by the roll. I think it cost me ten bucks two years ago. My wife & I both use it and we still have this much left. If you don't use it to light the woodstove or as a cat toy, it'll last you awhile.

Even if you are using a commercial pattern (and there are several good ones out there) don't cut out the flimsy tissue paper pattern that comes with it. Trace your pattern pieces on heavier paper (like butcher paper) and cut those out, saving your tissue pattern for the next time you want to make a garment and this time want an extra two inches on the left front piece or whatever. Everytime you alter your pattern from what it was, trace out a new one or you'll be sorry. Each minor alteration requires minute changes at other points that you may not be aware of until its too late to go back (ie after you've cut the expensive fabric.)

TIP 2: Which brings me to another point: "Do as I say, not as I do..."
I mentioned earlier being reckless and not doing a muslin for this project. I can get away with this because this will be the umpteenth doublet I've made. Even that's not really a good enough excuse, though, because even the most experienced tailor makes mistakes once in awhile. Even the pros rarely just sit down at the machine and wing it. I'm doing it anyway because the entire outfit is really a prototype for another outfit. I am confident enough in my abilities to anticipate problems and know that I have the MacGuyvering skill to roll with it and still turn out a suitably wearable garment. It's a gamble, but I feel pretty comfortable making it. Also, the mistakes are learning experiences and I have plenty to make before I put shears to velvet.

Don't do this until you're experienced enough to make the gamble with your eyes open. Fabric dollars add up fast and mistakes can be costly if you don't know how or can't correct them after the fact.

All that said, I advise making a complete mockup of your garment in muslin and trying it on before you cut even so much as the lining fabric. Better yet, make it out of scrap canvas in a weight and give similar to the final fabric you're going to be using.

If it's a doublet or slops, put it on, walk around in it. Do the things you think you're likely to need to do when you're wearing the final product. Can you reach? Stretch? Bend? Squat? Climb Stairs? Do jumpingjacks? Run a marathon? Fence? Swing from a chandelier? Quaff and ale? Fit your cuirass over the doublet? Fit your billowy shirtsleeve through the armhole?

Think of everthing this garment has to put up with and design and alter your design accordingly. You'll feel where it's tightening across the shoulders as you make a few parries and thrusts with your rapier. You'll notice the tightness and lack of give in the crotch as you try to bend down and pick up the cloak you threw across the puddle for your lady. If it's tight, loosen it and try again. Keep making alterations and new mockups until it feels wearable and you're sure the butt isn't going to tear out when you bend over. Then pull the seams and use that one as your final pattern.

HERE is a link to the Sempstress' website. She's great! This is where she explains in great detail how to make your pattern from scratch. I recommend this for your second doublet. Make the first one with a commercial pattern and wear it for awhile. Figure out what you want from it. Then go back and make it up from scratch.

Good luck!
Let me know how it turns out!
Scott