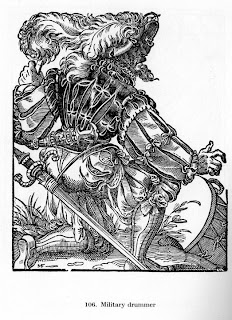
 Our German friend to the left there is probably responsible for the fashion for slashing and cutting panes into garments in the 16th century. Costume historians tell us that the flamboyant outfits of the German Landsknecht originated in the tattered garments of the battlefield and the booty. Very quickly, those slashed and draped fabrics became quite stylized as you can see from our fashionable friend, illustrated by Jost Ammon.
The fashion reached its high point in flamboyancy in the late 15th and early 16th centuries, as Teutonic mercenary legions carried their taste for stylish rags across the continent. By the late 16th century, which is my preferred period for costuming, things had died back quite a bit and the pinks and slashes tended to be smaller, but made up for it in volume.
The leather jerkin I am making is not an exact replica of a painting or extent garment. Though it is inspired by the one at the Museum of London that first inspired me to imagine I might want to wear a leather vest in the August heat. That garment is pinked with shaped punches to form a Lucky Charm cornucopia of hearts, stars, and diamonds. It's quite a whimsical garment, and if memory serves, Janet Arnold opined that it was meant for a child, a page in Queen Elizabeth's retinue.
Garb Carpenter
.jpg) |
If you want to do this at an event, the chisels used in the 16th century for this are pictured in Queen Elizabeth's Wardrobe Unlocked and a replica set in the back of The Tudor Tailor. I would link to someone currently making them, but I can't find anyone and all the leads I get take me to sites for blacksmiths who are no longer in business. Apparently not much demand for these things.
The chisels I'm using came in a cheap set that I picked up from Harbor Freight. They're not what I'd choose to use for a woodworking project; they're okay steel but not great. They do, however, hold an edge well enough to cut leather if you take care of them and keep them sharp.
If your chisels aren't sharp and you don't know how to sharpen them, take the time to learn to do it properly. You will be glad you did.
FAIR WARNING: Do not use a steel tool on damp leather. Make sure both are dry or the iron in the chisel will stain the leather black. Ever wonder why black leather was so prevalent for so much of history? That's why. Put it in an iron-oxide bath and your leather will be black before you know it. This is why leather stamps tend to be coated or made out of stainless steel.
There's not a lot to say about this, so here are some pictures...
.jpg) |
| This picture gives a good idea of the size of the slashes. Also dispels any notion you might have that I'm a manicure sort of guy... |
.jpg) |
| After examining as much as I could of some period ones, I didn't want it to look too precise. I marked the larger holes 3/4 inch apart, and marked one edge of each slash, one inch apart, then free-handed the rest of the holes and the angle of each chevron. So there's a bit of variation in each. |
.jpg) |
| I decided to eyeball the chevrons to keep things from looking too staid and mechanical. |
.jpg) |
| A decent set of hole punches is worth its weight in gold when you're doing this. |
.jpg) |
| This is the back of the jerkin, almost done. |
 |
| It is pretty, though... |

.jpg)
.jpg)
.jpg)
.jpg)
No comments:
Post a Comment