Showing posts with label Accessories. Show all posts

06 March 2013

A Beginner's Guide to Girdles: Belts in the 16th Century (X-post from Ren Artisan)

This was originally posted at the Renaissance Artisan Project my year-long (sic) project to explore all the crafts of the Elizabethan period. There are plenty more like it. In recent weeks we've made pins, explored two kinds of beer mug, and learned to knit.

54 Livery Companies representing 111 crafts in 52 weeks! What could possibly go wrong?
(Narrator: It would all go very wrong, but in an interesting way...)
~ Scott

-------
I've been to many renaissance faires and acted in quite a few, so I
don't walk around with a clipboard, taking note of the inaccuracies. That would be boring and boorish. Nonetheless, I think the one I find the most vexing for me (because it would be the easiest one to fix) has to be the Big Errol Flynn Pirate Belts I see walking around with people attached to them.

Belts in the 16th century just were not that wide. And the buckles are almost always all wrong to boot. I look at a lot of old artwork, delving into the sketchbooks of the artists when they're available, and nowhere do I see those big belts. And the metal-detector finds back me up on this one. The buckles we find just simply aren't that big. On average, buckles of the period seem made to fit a 1/2 - 3/4 inch strap.

I can't help noticing these things. It's a curse.

It's important to note that in this time period, belts weren't for holding your pants up. That's a relatively recent development, actually. Belts were there to hold your knife, sword, and/or purse and not much else. (The "I have everything I own tied to my belt" thing at renaissance faires also bugs the crap out of me, but I digress.) In the 16th century, your pants were tied either to the waistcoat or doublet with cords, called "points". In order to take your pants down, you had to take off your doublet or untie your points.

And before you ask: Yes, methods for disrobing and going to the bathroom are a common topic of conversation for male reenactors.

A properly-sized belt worn above a row of bows where the man's lower garments are joined to his upper garments. 

Take a good look at Robert Dudley at the top of this post. He was Queen Elizabeth's favorite throughout most of his life. The very image of mid-reign manliness at the height of Elizabethan fashion. See his sword belt? It's maybe 3/4 inch wide at best. Probably less.

I only bring this up because it's a pet peeve (and you thought I only had pet cats) and because when we do these projects, it's important that we're replicating items as they actually were, not as Hollywood depicts them.

Of Buckles & Leather

The straps I use are generally 5/8 inch. Even this might be a bit wide. These original Tudor buckles from metal detector finds that are being made available for sale from UK website Crossman Crafts are affixed to 12 mm (1/2 inch) straps: http://www.crossmancrafts.co.uk/salvage/

Yes those are real Tudor artifacts. Buckles are so abundant in the finds and so often made of base metals that they're rarely rated as "treasure" in the legal sense, so they can be and often are sold and exported. Aside from the obvious auction sites you can buy original pieces several places online. I like Crossman mostly because the site owner is a craftsman after my own heart and quite generous with his advice to other craftspeople. There's also Gaukler Medieval, which offers a small and ever-changing trove of original items, including artifacts of various periods: http://medievalwares.com/index.php?main_page=index&cPath=65&zenid=2mo9kdrnt8333hk2una5ghv6p1

Of course you can't ever really own a piece of history, but you sure can rent one for awhile.

Note that the real buckles don't look like most of the ones you see at the stores or in movies. The most prevalent in our period are what's known as a 'spectacle' buckle. Meaning they have two rings, and kinda look like a wee pair of glasses. They were made by casting in bronze and brass and/or various precious metals as suited the man or woman that ordered it.

At some point, we have to do some casting. The Goldsmiths, Pewterers and Founders companies lie ahead, of course, and that's what the soapstone in this picture is destined for. Casting projects will likely include buckles because they're an item that one always seems to need, as well as buttons and maybe some silly oddments like pilgrim's badges.

All that lies ahead of us, though, because the Girdler would have probably bought them or had them made special to his specifications by someone from one of those other specialties, then assembled them in his shop. If nothing else, the simple brass ones we're working with here wouldn't have been made much fuss over because they were for the more common folk such as your this humble craftsman whose hands you see here.

I think that I have a burr about belts because they're a very simple project. My first ever leather working project was a belt. I think I was ten. Even before that, my exposure to leatherworking was mostly my dad or grandpa punching extra holes in my belt to keep my jeans from slipping over my scrawny hips.

The Girdler's company did more than make average leather belts like these. They made fine girdles for ladies and sword belts for gentlemen. This sort of thing would be relegated to an apprentice, I should think. All the same, it's an important piece of kit.

For a simple, leather belt, there's only two pieces to worry about: A belt and a buckle.
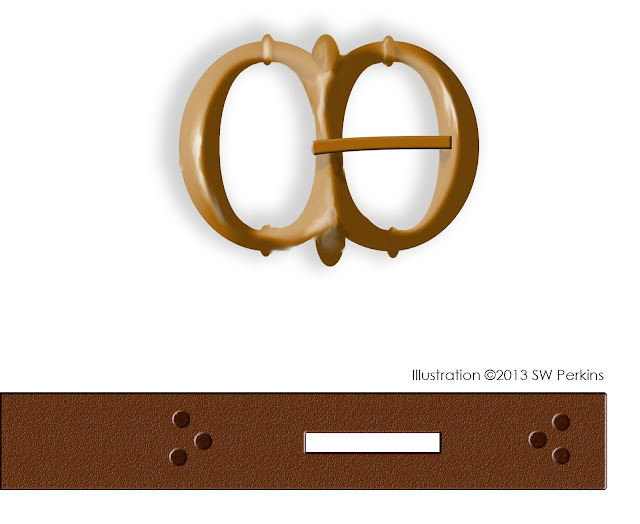

It goes like this: 

  1. Order your buckle and cut an appropriately-sized strap (or buy one at a leather working supplier like I usually do. Unless you buy your leather wholesale, the savings of cutting your own straps just doesn't pan out like you'd think it should.) 
  2. Cut a slot near one end of your strap to accommodate the tongue of the buckle. 
  3. The buckle slips on, with the tongue passing through the slot and given enough room to travel by adjusting the length of your slot. You might have to fiddle with it a bit. 
  4. Sew the buckle in place. I like sewing a little triangle as you can see, but there are plenty of other methods. 


NOTE: Don't use pop rivets. They're convenient and I confess to having used them a lot before I learned better. Pop rivets are never really necessary and never look quite right. If you want rivets, go to your local hardware store and buy some proper ones and learn how to peen them properly.
Honestly, sewing is much easier. Just punch the holes ahead of time and wax your thread like we did with the leather jack we made the other day.

Now, you might be saying "This article is incomplete" and you would be correct. The simple leather belt was the least of the Girdler's wares. Sword belts and fancy adornments for Milady's waist were the heights of their trade, but we're working on the lives of the commonfolk here at the School of the Renaissance Artisan.

Not that I wouldn't like to see input from some of the great craftspeople I know who specialize in those other areas.

Much like the pins we began this journey contemplating, what this simple leather belt gives us is a jumping off point for further explorations into the craft of those who cast the bronze and brass buckles, the craftspeople who tanned and sold the hides, and so on. This humble belt, assembled by a Girdler's apprentice, sits at the end of a long chain of suppliers, all of whom stand between us and the culmination of this project come December.

For the moment, though, revel in your perfectly period Elizabethan leather belt to gird you against a chaotic world.
~ Scott

27 July 2011

Tools of the Trade :: Garb Carpentry

Things you need to make garb: Cloth, sewing machine, needle, thread, scissors, coping saw, drill, hammer, drawknife...


We're not going to build a house, but we are about to get into some fairly involved leatherworking here. "Wet forming" leather requires something to form it around. Usually, this is made out of wood. So, a certain amount of miscellaneous carpentry will be necessary.

It's either that or cast your molds in concrete.

I'm an avid woodworker, so I already have a lot the tools I needed to make the things we'll be talking about in the next month or so.  Some of you will too, or someone in your family or close circle of friends will have tools you can borrow.

There are always things that will make a task easier. A jigsaw is faster than a coping saw just as a lathe is faster than whittling. I'll stop periodically and talk about tools if it's necessary, but here's a very minimal list of what you'll need from the hardware aisle.
  • Wooden or plastic mallet
  • Coping saw
  • Scratch Awl
  • Tack hammer and/or staple gun
  • Sharp pocket knife or woodcarving knife
  • Sandpaper
  • Care, patience, and a First Aid kit
Universal Caveat: If you're not sure how to use a tool, don'tFind someone knowledgeable to help or show you how. Keep all of your tools as sharp as possible. Be careful. Think twice, cut yourself not at all.

If you're really lucky, there's someone you can show a picture of what you want and have them come back in a few hours and hand it to you.
NOTE: None of this is terribly complicated. I was 13 when I learned most of this in a shop class at school. If dorky, awkward, 13-year-old Scottie can do this, you probably can too.

As always,
if I can think of an easier way to do anything, or find a shortcut for you, I will post it. Even if it's a link to what someone else did.


As far as leatherworking tools go, a lot of what you need you'll already have in your sewing kit. Even if you decide to tool any of the leather, a nailhead or anything can be used to make marks in the leather. Tools specifically to leatherworking can be expensive and if you're not going to use them again, you can skip them.


Yes, you can do leatherworking without buying stock in Tandy. There are some specialized tools that will make all of this easier if you have them, but they're not strictly necessary. You cannot, however, do it without buying leather. For that, you will need to find a local supplier or order it online. I encourage you to check online or in your local Yellow pages (remember those?) and see if you can find a local leather supplier. Most larger cities have them. Here in Seattle area, we have McPhereson's leather.

The leather used for all of these projects is "vegetable tanned" leather. That means the tanning process used tannins from natural vegetation to effect the tanning process. Some places sell it as "tooling leather" because it's perfect for these projects because it's non-toxic, easy to work with and takes tooling and shaping well.

NOTE: Leather is not sold by the yard. The price on the wall might tell you how much per square foot, but that doesn't mean you can buy one square foot of leather. Leather is sold as hides (whole animal) sides (half the animal), bellies (just the belly bits), and scrap. Scrap is usually sold by the pound.

At the moment, a mid-grade full hide (veggie tanned) will probably run you about $140 online. Many if not most of the projects here can be done with large scraps, so you might not need to buy an entire side.

If you want to do a lot this, it's more economical in the long run to buy the entire hide, but it's up to you and your budget.

Go ahead and select some dyes and a sealer as well while you're there. Tell the folks who work there what you plan to do and they'll advise you. Generally, anything that will touch food or your skin should probably be a non-toxic as possible, so pay attention to what's in the dyes you buy and think about how you'll use them.

To work the leather, you will need a couple of tools, some of which you'll already have:
  • A knife (I usually use a box knife)
  • An awl
  • A plastic spoon (yes, really)
  • Glover's needles (available at most leather or sewing stores)
  • Sinew or strong thread
  • A ruler.
Things you might want that will just make your life easier:
  • Skivving knife
  • Stitch-spacer

If you have those things, you're ready to start.

23 March 2011

The Worshipful Company of Glovers Museum Collection is Online!

Speaking of gloves, this wonderful link comes to us via the folks over in the Tudor Discussion Group on Facebook.  So many pretty things to look at.  Most of them are sadly 17th century, but there's a good deal from the Jacobite period and (my wife hastens to remind me) more examples of early European knitted gloves than I've ever seen in one place at one time.

The Worshipful Company of Glovers of London

The Glove Collection and its Catalogue


Tell them I sent you!  (It won't get you anything, but it might confuse them long enough while they try to place my name that you can get a good look around...)  Cheers!

19 March 2011

A Glover, Not a Fighter

Still doing remodeling and still don't have access to my workshop because it's being used to store the things that would normally live in the rooms we're revamping.

So... let's talk about gloves.

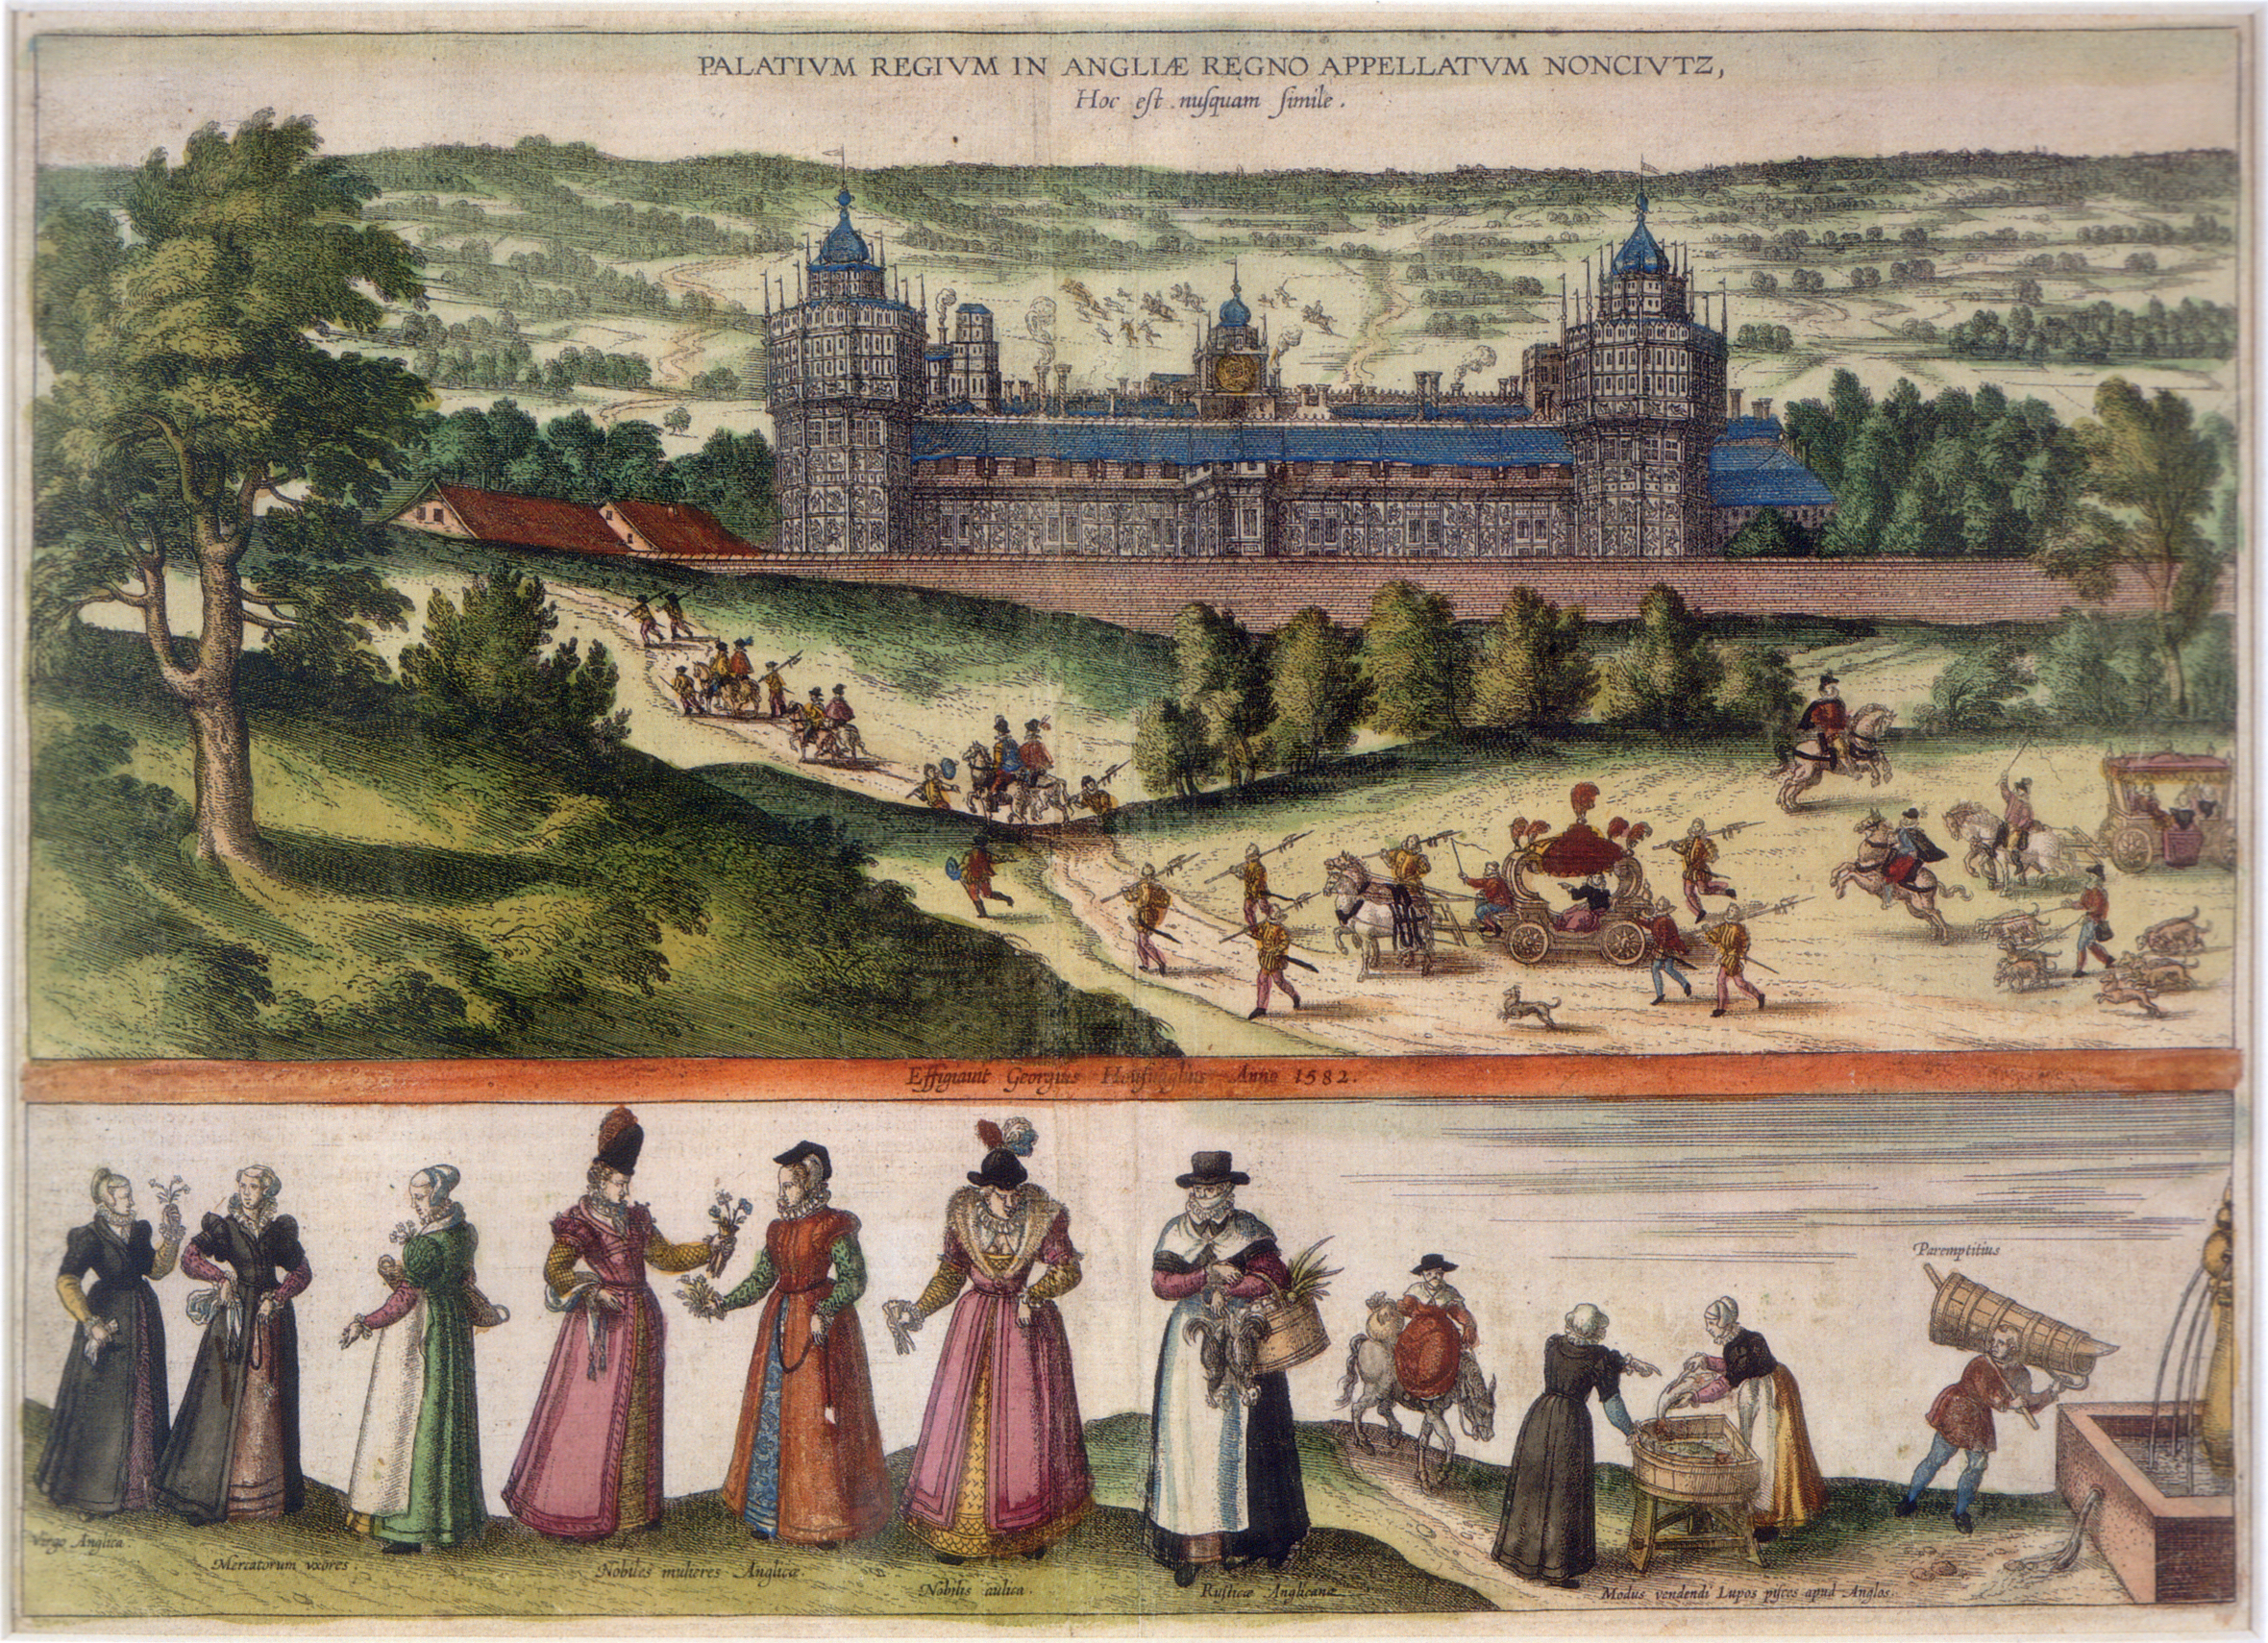
Gloves like the ones Shakespeare's dad made were probably less fancy than most of the ones we have in the Victoria & Albert museum, most of which came from the wardrobes of nobles and the crustiest part of the upper crust.  The rest - such as we have - live on in fragmentary bog finds, shipwrecks like the Mary Rose, and the marginalia of Joris Hoefnagel's maps.

Paintings of the renaissance show a variety of cuts and decorative techniques, including the same pinking and slashing techniques used on other garments.

Marginal characters from Nonesuch Palace engraving by Joris Hoefnagel

As a longtime leatherworker, I have the skills and tools to make a pair from scratch... but they're a finicky sort of thing with a lot of handsewing and overall a bit of a pain in the butt.  This is confounded a bit by the fact that Washington's faire season falls in the hottest part of our summertime (as do many others), so I rarely need gloves with a costume.  The mornings are wicked cold around here though, so from time to time...

All of which makes it a mixed-bag spending anything like the money and time necessary to make a decent and attractive pair suitable for the time periods in which I work.

Eventually, I'll be getting around to making my own, but for now, I needed a pair of gloves that looked okay from ten paces away and won't detract from whatever costume I happen to be wearing at the time.  It was time for a cheap alternative.

Which is when I remembered a costume party awhile back, where my friend Patrick dummied up a pair of gloves for his bomber pilot costume by dying a pair of standard workgloves a darker shade of brown and turning back the cuffs.  They looked pretty good, all things considered.

And then I said to myself, we're remodeling.  We have a lot of work gloves lying around right now...


We buy them bulk, actually.  Nice deerhide  leather work gloves in threepacks from Costco.  So I grabbed a pair of scissors and a hole punch and started changing them from workgloves circa 2011, to something approximating the right protection for a renaissance hand.

Maybe even a  steampunk glove, who knows?

Feibings "Cherry" leather dye and a hole punch


The biggest change was re-cutting the cuff in a crenelated pattern
similar to what you can see in the Hoefnagel engraving above.
I'm reasonably happy with how they turned out.  The dye job was still wet in that photo (I'm wearing a vinyl glove inside there) so the colors will even out over time and then we'll apply a wax or finish to polish them up. 

For something I may wear a couple of hours a year?  They're perfect.

26 January 2011

Arbuckle Rogers - Venutian Ventilators (Nerf Repaints)


Short post today, sorry.  I'll make it up next week when I do the first in a series of leather demos suitable for all genres of costuming... in the meantime, hie thee to the armoury!

I didn't have the budget for one of these from the wizards at the WETA workshop (Follow that link if you've never seen the Weta raygun collection. The advertising videos alone are worth the trip!)  I  also, sadly, didn't have the time to trawl thrft stores looking for just the right lamp bits to make one of these beauties.

So, like thousands of raygun-craving steampunks before me, I picked up some spray paint and went hunting for just the right Nerf gun...


In keeping with the theme, they are a repaint of a Nerf gun that's rarely seen and probably discontinued, a single-shot Nerf Tech Target pistol which has delightful Atomic Age lines and once I hit it with a bright metallic gold spray paint and just as I did with the helmet, I treated it with a wash of burnt umber FW acrylic drawing ink to deaden the glow-in-the-dark shine of the gold, they look as if they're old brass.
It occurs to me that a proper "antiquing your props" article needs to happen.


I also made a custom wet-formed leather "gunslinger" gunbelt for these and between this and the leather masks I make (which use a very similar process) I think I'm about ready to do the wet-formed leather tutorial I've been meaning to do for quite some time now.

(Coming soon!)

Eventually, the mood might strike me and I'll make myself a scratch-built set of dueling pistols, but for now, I'm content to focus my attentions elsewhere and in the meantime, it's nice to be able to pummel my friends and enemies with foam darts.


24 January 2011

Arbuckle Rogers - A Space Helmet (repaint/mod)

The jetpack is, of course, the iconic prop for any sci fi setting, but when I was a kid, the thing that fascinated me the most about Star Wars and the like was always the cool helmets everyone got to wear.

Put it this way: If I'd been Harrison Ford, I'd have insisted that they add a cool helmet to my wardrobe.  Sacrilege?  Maybe, but it was sincere sacrilege at least...

Since I don't have the facilities to do vacu-forming (yet) all of my helmets so far have been modifications (sometimes pretty serious ones) and repaints of existing helmets.  


NOTE: if you decided to do this, don't expect them to protect your head when you're done.  The goal is to achieve a fun, cool-looking prop, not a piece of genuine safety equipment, even if you started out with one.


I decided early-on that in order to really sell the idea of a steampunk "Buck Rogers", I needed a helmet.  


As is so often the case, I returned to the iconic "Spaceman Spiff" helmet sometimes worn by Calvin in the comic strips.  I think Bill Watterson was working from the same childhood aesthetic as I when he created that (as well as most of the props for Calvin's imaginary exploits). 

For my helmet, I hunted high and low for one with the right lines and ended up choosing a child's snowboard helmet that I picked up at a thrift store for a couple of bucks.  I chose it for its art deco profile and resemblance to the "Spaceman Spiff" style helmets in my imagination.


The vented sides are one of my favorite elements.  Combined with the aerodynamic lines, it really sells the space-opera effect I was going for.  The knurled brass knob seen below is a bit of added bling that I picked up at the hardware store.  It secures the lining and chin strap into the helmet.


I'm a huge fan of subtle design elements.


I've handled a number of reproduction and real helmets both real and decorative and even once got my hands on a Victorian-era brass fire helmet.  All of the ones I liked most had embossed patterns worked into them, usually in an Italianate viniform motif.  The Victorians loved this kind of decoration, and almost everything was decorated.  In metalwork, however, they tended toward playing with light and shadow rather than gilding and paint like the suit of armor at the end of that second link.


To accomplish this effect, I painted swirling designs in thick acrylic paint between the first and second coat of metallic copper spraypaint.  Then when I went over the whole helmet with washes of FW Burnt Umber acrylic drawing ink that I then ragged off, the ink remained in recessed areas and the raised areas remained bright, giving the illusion of greater depth than is actually here.


After the inkwash dried, I worked several thin washes of forest green into the creases to accentuate them even more and imply the sort of verdigris that builds up over time on real copper.  This also had the effect of dulling the fake metal-flake effect given by the spray paints even further until the whole thing was virtually indistiguishable from the real copper wastebasket in my bathroom.


With all of the styrofoam yanked out, it fit my head much more closely than a ski helmet, which is one of the reasons it doesn't scan immediately as a repainted plastic ski helmet.  I sewed-up a quilted cap liner out of linen to replace it.  Naturally, this invalidates it as a crash helmet, but it fits more like a classic helmet this way and since it's only for costume use, I figured what the heck, why not?  And Styrofoam's not very Buck Rogers anyway...


18 July 2009

Crewel World II

In Crewel World part one (click to go there) I talked about a rapier carrier I made a long time ago. The design incised into the leather (shown above) is drawn from a tile in a cathedral somewhere. Sadly, I've long since lost the original picture the design was based upon as it was many years and a couple of computers ago. Nevertheless, the design has been re-cast in whole or in part on a great deal of the garb I've made since then.

Yesterday, I did it again. For the lid of the purse I'm making I brought the design into a more Elizabethan vine motif and coloring while maintaining the original cruciform arrangement of the elements.

The design was drawn onto the green canvas with a stick of graphite (you can still see some of the marks in the photo below) and backstitched over the marks with crewel yarn to give dimension to the embroidery. The backstitching was covered with satin stitch, and buttonhole stitch using linen and wool thread.

I chose a darker background color that the off-white used in the inspiration garment (and other very similar designs scattered through the Elizabethan world). This is because my hand will go into and out of the purse fairly often, making this an item that will be especially prone to getting dirty.

The aforementioned inspiration garment can be found here: http://www.plimoth.org/embroidery-blog/. The folks at Plimoth were re-creating a heavily embroidered late-period jacket entirely by hand. This entailed reconstructing unknown stitches and techniques. I say "were" because the funding for the project has been canceled owing to the current economic troubles. (The embroiders involved have vowed to continue despite the lack of funding, so there's hope.) Follow that link, you will be amazed.

08 November 2005

The Terrible Tangent

This past weekend, my accessories tangent staged an overthrow and seized control of my project time. I've been looking at the paintings of Sr. Moroni and noticed that almost all of the men of distinction (with the exception of the man in the painting I'm basing this outfit on) are holding books and other items of scholarship. I love books. I used to run a bookstore. I write novels in my (allegedly) spare time.

So... my new garb needed a book. A Psalter to be exact.
So I dove into my extensive library and came out with Hand Bookbinding, A Manual of Instruction by Aldren Watson (Dover, 1986 ISBN# 048629157X). Yes I happened to have a manual of bookbinding on the shelf. I'm a rennie and a bibliophile. I also have a book that would allow me to replicate Nelson's Flagship to the last nail. I also came up with a copy of the Vulgate Latin Psalms I printed off a no-longer extant website a few years ago. Good to go.

Since this is my first book, I decided to bind it blank and make it a sort of journal, just to try my hand at the art and craft of bookbinding and be certain I could do it before I put any real effort into a latin psalter. I never do anything half-way, though, so I spent a bit of time tracking down some scrap leather as well as coming up with a clasp and corners to provide the right look I was going for.

For a few years I've been mulling over the idea of binding a book or two, so over all that time I've collected oddments I thought would be good for the future book I was planning. Sometimes it takes years before I've collected enough in my Venus Flytrap of an imagination to start work. Certainly that's the case here. The corners are box corners I found at a craft store on closeout last year. They're thin enough metal to manipulate a little to make them more suitable for a book. The clasp is a fairly standard La Mode clasp from the fabric store, and the leather strap is leftover from making my rapier hanger a few years ago.

Notes on Nomenclature
I know, I know. Usually I'm not a stickler for nomenclature. 9 out of 10 times this is out of laziness or a general distaste for having to use parenthetical asides to translate tech-talk into laymanspeke. That said, I've been assured that bookbinding simply won't work if you don't know how to talk the talk. I'm skeptical but I'm going to go along with it for now... just in case.

The book will be a small one, an "Octavo" it's called, meaning that the paper making up its pages have been folded in half twice so that - once they are cut - they make eight pages. The cuts were all done by running the back of a butter knife along a creased edge, giving the paper that ragged look which modern binders call the "deckle" which is just a fun word to say. If you do it right, you're left with individual rectangles creased down the center, which are stacked to look like a little pamphlet. The individual section is called a "bifolio" and together they form a "quire" or "signature". The signatures are stacked and sewn to a series of cords using something that looks a lot like a chain stitch. Some books also feature signatures sewn to one another with what looks like a buttonhole stitch.

I will be raiding my wife's supply of resume paper for paper of the correct weight and cotton-rag content. I'm working with 14 signatures of 4 bifolium each. I stacked them and drew a line down the spines of the signatures and then pricked them along the three lines as I will be doing a three-cord binding. The pricks in the paper will allow the sewing to take place without having to force my way through multiple layers of paper with each pass of the needle.

One of the things I found in the magpie stage of my bookbinding planning was a frame which - with some suitable modification - makes a smashing good sewing frame for the binding of books. Keeping the cords taut makes sewing to them much easier. (Yes, that link shows a slightly different method than I used here) The dowel along the top allows me to tighten the cords which are secured to the frame by pushpins, crude but effective.

The thread is 100% linen, which I waxed with the little hexagonal block of beeswax you can see in the picture. I picked it up last summer at a farmer's market. Bookbinder's needles can be found a most stores which sell scrapbooking supplies or you can use darning needles and dull the tips. Dull tips keep you from further damaging the paper as you're sewing through it. Waxing the fibers not only make pulling the thread easier, the wax also helps seal the hole in the paper a bit as it's rubbed off, passing through the hole.

Once I had the signatures sewn to the three cords, I pulled it out of the frame and found two suitable boards a little larger on every side than my text block(the stacked and sewn signatures are referred to as the 'text block'). I lined up the cords and then drilled holes in the boards for them to pass through. Most binding was done with either pasteboard or oak boards. Pasteboards were/are a cheap and speedy alternative to woodworking and oak resists warping. I had neither oak nor pasteboard handy so I went with pine. (I might regret it someday but it's an experiment, so it doesn't matter that much to me, to be honest. Remember what I said about prototyping and beta testing my designs?) The pine was sanded, the edges beveled and the wood treated with a hardener.

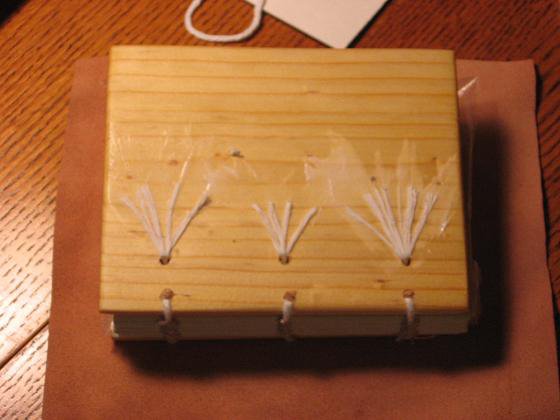
This is a picture of the book halfway to completion. The text block has been sewn to the cords and the cords threaded through the holes drilled into the cover boards. Note that pegs have been hammered into the holes to tighten and secure the cords. This also has the effect of tightening the binding. Paleographers and Codicologists (scientists who study old writings and books, respectively) describe a book 'that resists opening' as being a good binding for our style and time period. That's what I'm going to be going for.The ends of the cords are trimmed and then dragged along the edge of a knife to fray them. The frayed ends are then splayed out along the board so as to avoid unsightly lumps beneath the leather that will eventually cover them. This means they are twice secured: once by the pegs and once by the paste sandwiching them between wood and leather. As you can see, I pasted mine down in advance to keep them out of the way until I got around to gluing leather over them.

The leather you can see lying beneath the nascent book in the picture above is the leather I chose. It's a buff leather chosen in keeping with the 'things I had lying around' theme. This used to be a poorly-assembled vest that some RV enthusiast had plastered with patches and stickers from their travels and then sent to Goodwill. I was happy to peel off the stickers, clean the leather and give it a good home in my project box. Now it's a book cover. Wouldn't that RV'er be surprised what happened to their old vest? I love recycling!

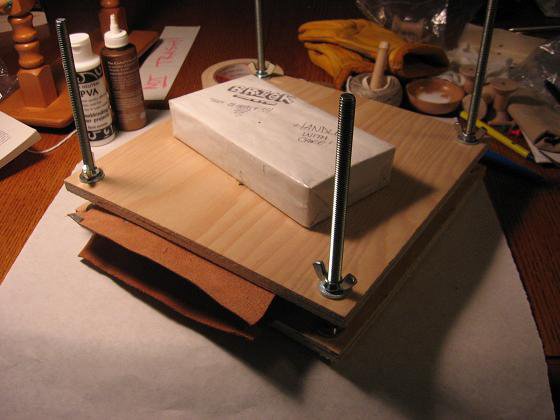
I cobbled together a press out of plywood and lag bolts to use in the gluing portion of the programme. It's based on an enlarged version of a flower press I saw for sale somewhere once upon a time. I figured it would be good for applying strong, gentle and even pressure across the surface of the entire book. The leather is applied only to the front and back using PVA adhesive (see below). I did not glue the spine or the edges, those will be dealt with in good time.

PolyVinylAcetate (PVA)
PVA is what is known as an 'archival' adhesive. I keep it on-hand because it's very useful. Anytime someone uses the term 'archival' it means that it has a nuetral or near-neutral Ph and therefore won't accelerate the adverse effects of aging. One of the reasons old books are deteriorating in our libraries is because the paper and hides used to create them were acidic, as were the glues, inks, sizes, etcetera. The books literally are eating themselves. Animal and starch-based pastes that were used by period binders drew bugs and didn't help matters. I'm opting for a modern solution here, but if you want to be really authentic go here to learn about making wheat paste which IMHO is better (less smelly & substantially less annoying to make) than fish glue.
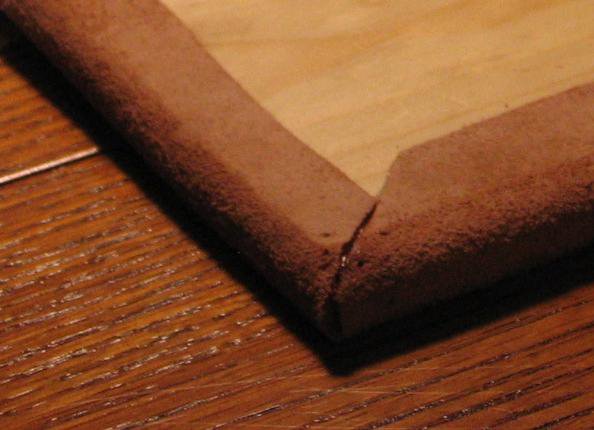
Once it's out of the press, the edges have to be mitered so they will meet cleanly on the insides of the covers once you're ready to glue them under. So the corners are lopped off at a 45 degree angle, the width of the cover boards away from the corners. That's important, that's why its in italics. You then need to cut divots from your mitered cut down to the actual corner of the book so you get a clean meet at the corners when you fold the flaps in. Like so.

Some fudging is possible if you're going to use metal corners, but a bad fit is a bad fit and it will show, even with the corners on there. I've seen it, even if I wasn't binder enough myself to say what was wrong with the book in my hand, I knew it was wrong somehow.

Now its just a matter of glue, fold and press...

Always brush glue toward the edges. This alleviates the pooling in the middle effect that will give you a bad (read: "Lumpy") glue every time.


I use a combination of tacks, clamps and binder clips to hold the flaps down while I do the others. Be sure to tuck the leather under the bound edge of the book and clamp that area especially. That double-thickness at top & bottom of the spine add a lot to the stability of a book.


In the press. Since I'm doing this at the dining room table I decided to raise my ersatz bookpress up off the wood to keep from scratching things up. The title struck me as appropriate.

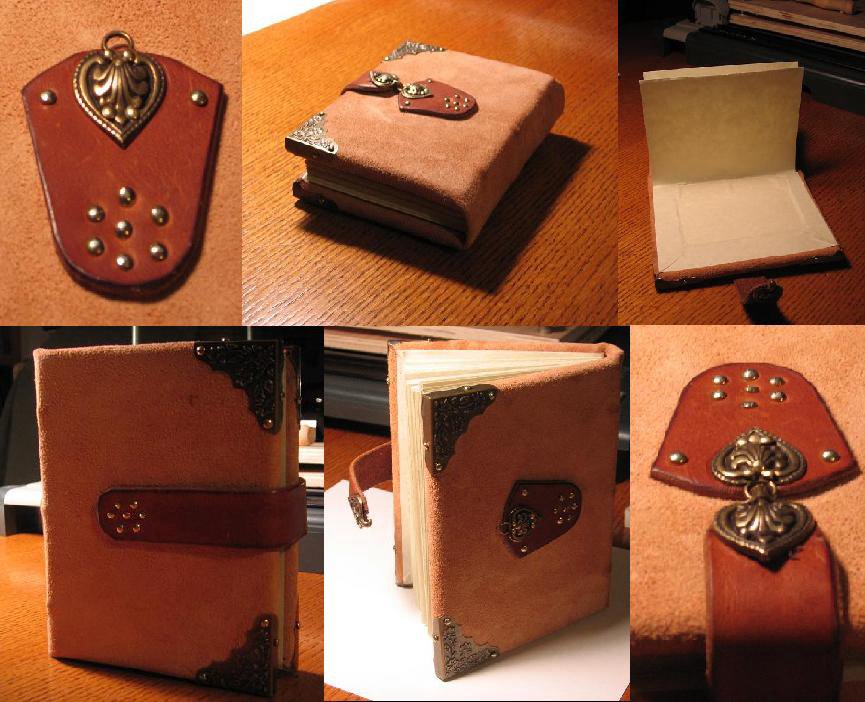
Below is a montage of pictures of the final product. You can click for a larger view if you're curious. I'm ecstatic with the way it turned out. The final will be made with heavier rag paper and nicer leather (A nice blood-red Moroccan strikes my fancy) and will have pewter or at least silver-colored accoutrements. In the meantime, I'm going to have fun scrawling poetry in my current one.


And now we return you back to doublet-making after a nice long walk down accoutrement lane to clear my head! Thanks for indulging me.

-Scott
02 November 2005

Accessories

Figaro has stabilized and we're waiting to see if the medicines they put him on helps. In the meantime, I'm trying to get back into the swing of the sewing-thing. To ease into it, tonight, I'm going to talk about accoutrements.

A lot of rennies run around with so many things hanging from around their waist you'd think they were peddlers! I'm not generally one of them. As Calabash I tended to carry a lot of toys around to entertain the kiddies with, but in my new role, that won't be necessary.

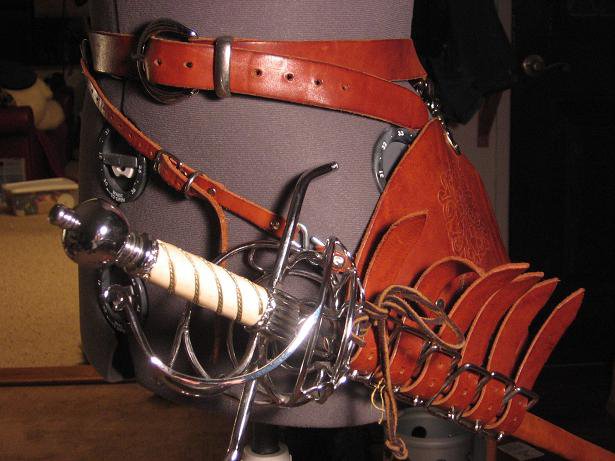
In the Moroni painting I'm going by, the Duke is wearing a rapier on a fairly standard sword hanger for the time period. Because of the angle of the sword as he is holding it, I have to assume it's a two-strap holder in order to allow that kind of play. Either that or Moroni fudged it a little for artistic reasons. His is black leather, but I'm a freak and don't particularly go for the whole black leather thing. That's what everyone else does. I like autumnal earth tones in general and I take my leather accoutrements brown when I can find them.

For the beta costume I will be wearing slightly more on my belt than the gent in the painting, largely because I need to carry more items with me since it's sometimes a long walk back to the pavilion for needed gear or props and I have to have myriad ID and keys on me that have to be hidden. Such is life in the art of melding the 16th and 21st centuries.


I made my sword belt out of a nice heavy brown latigo leather I bought at scrap prices from MacPhereson Leather in Seattle's International District. I also found most of the findings there. I had to fudge things a little because I was still living in an apartment at the time and didn't have access to the kind of metalworking paraphernalia I now have.

The metal bracket that secures the hanger to the sword belt is actually 1/2 of a hinge with a D-ring and hook worked into it, which I think you can see in the picture below. This was easy to fabricate with the limited access to tools I was dealing with. I've an affection for nickel finishes rather than the brass everyone else seems to use with the few brown leather items available out there.


The design worked into the leather is recycled from a 15th century tile design found in a cathedral. It's a fairly typical medieval cruciform design. I'm terrible at keeping track of those things,I'm afraid. I'm sure I found it in one of the myriad Dover books I used to sell back when I ran a bookstore - which was around the time I made this rapier hanger. I'll try to locate it if anyone is really interested.


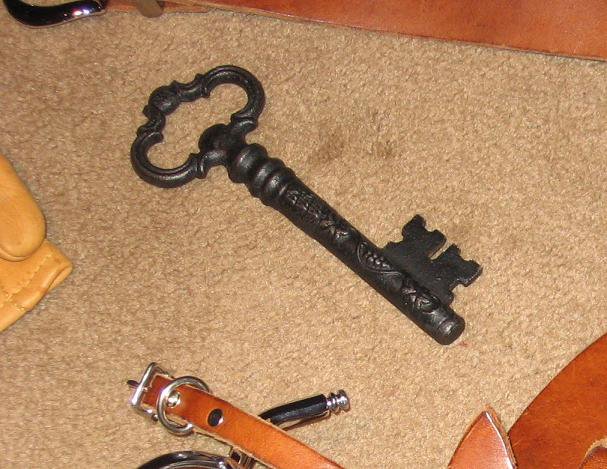
Because the character I will be playing will be essentially lower middle class (the sheriff) A few other items of note will be my keys (above) and manacles (not pictured). The key shown in the picture is generally referred to as "The Cathedral Key" because it serves the dual purpose of bottle opener! The barrel of the key even bears a the motto "IN VINO VERITAS" (In wine is truth). Of all the silly things I've carted around on my belt over the years, this has probably been the most useful.

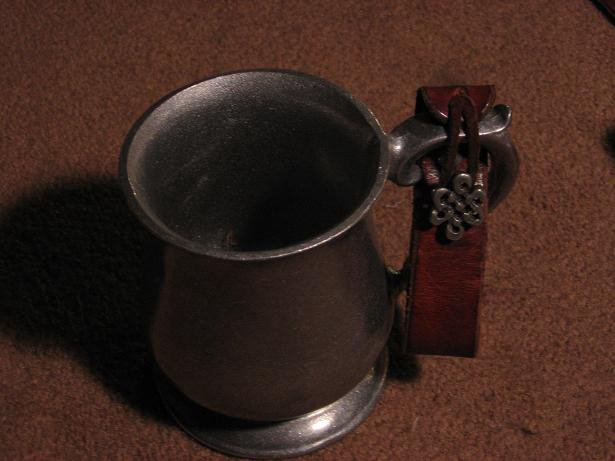
Also rans include my mug and mug strap, which I made on my own design (shown below) and a belt pouch that I patterned after my sporran, only much smaller. It's just the right size to conceal my ID, camera and money securely against my person in such a way as to deter cutpurses. Also I carry leather fencing gloves when a fight gig is in the offing or if it's a cold Washington morning. Most of the time those won't be around. Also I tend to carry a stag-handled eating knife I picked up at a Thrift store back in the day for about five bucks (score!) rather than a dagger.


I am well aware that the mug on a strap on your belt is a favorite pet peeve of the non-faire reenactment community. However, as guildmaster for the Villagers at my faire, I find it my responsibility to present the image of how I want my villagers to act, and my A#1 goal for the villagers is to keep them hydrated!!!

It's darn hot out there and we're doing a lot of very active bits and gigs. Water is essential and running back to the encampment to get your mug isn't always an option. We've had people go down to heat exhaustion in the past and I've made it my mission to keep that from happening again! Hence our belt-hanging tankards being non-negotiable. If all-else fails keep in mind that our guild patron is Saint Brigid, who is (among other things) a patron of beer and brewers! How best to pay homage to our namesake?

The Ghost of Accessories Yet-To-Come
For the final costume, I will be making a new sword hanger with more period-correct metal findings, though whether I will be purchasing those or fabricating them remains to be seen. The leather will still be brown, and I'll be making a new purse and perhaps an en-suite parrying dagger or stilletto will be in the offing depending on time and energy levels when the time comes. Shoes for the final noble outfit wouldn't be out of the question either.