Since we began our journey back in October of 2005 (a bit earlier for me, but that's when you joined me on the road) my feelings on several aspects of this art & craft have changed. The five central tenets of my costuming mantra have not... let us review:
1. Good garb feels natural when you’re wearing it.
2. Good garb won’t kill you to wear in the August heat.
3. Good garb is clothing you won’t hate putting on in the morning.
4. Good garb is just as durable as the other clothes in your closet (or better).
5. Good garb weighs style against wearability and strikes a healthy balance.
Over the years, I've added a few addendae to support and expand-upon the central philosphy...
Nomenclature: I like the word "Garb" and use it in part to differentiate between my everyday street clothes and what I make for reenactment and/or faire. Another period-correct word offered up by the venerable OED is "Duds". I use both, but mostly I call it 'garb' or 'clothing'. I generally shy away from "costume" because I don't like the immediate association with Halloween despite its literal definition.
Handsewing: I made this doublet entirely by hand so it's not a question of ability it's a matter of the best-application of a finite resource: time. I actually like handsewing now that I've accustomed my hand to it. But I lack the time for such efforts. So I will use handsewing when it suits my whims or if it would be too obvious otherwise. Long or turned seams usually go under the frantic needle of the hotrod.
Period Perfection: All of the clothing I make is based upon historical paintings and patterns (where possible). Unlike many who perspire over handsewing and 100% period fabrics, I tend to focus more on the overall “feel” and the correct “look” of a garment. This makes me a heretic in some circles. I am comfortable with that.
Garb Engineering: My wife is an engineer. Certain terms have bled into my sewing vernacular, like "Prototype" and "Beta Test".
All of the clothing I make is Action Garb.
If I could have one overall effect on the historical costuming community, it would be this: The items we are making were the everyday clothing of the people in the historical era we are portraying. (That's tenets #1 & 4 if you're playing along at home.)
People lived in the stuff we're imitating here. The chased lovers (and were chased by lovers if they were lucky), coddled children, fenced, swung from chandeliers, quaffed ales, guffawed hearty guffaws and generally lived full active lives in their clothes... their garb. Sometimes I think we forget that in our blind pursuit of what we allege to be 'period perfection'. It is possible to "be period" and be comfortable at the same time. Even in nobles. What good is garb that looks fabulous, is made of expensive period materials, and is as uncomfortable as the Iron Maiden? If you can't feed yourself, looking pretty won't do you any good. (We lose more nobles that way)
The best advice I can think of is... Don't fret so damn much. This is supposed to be fun. Attain the look. Make it wearable. Make it comfortable. Don't stay up nights worrying about it.
A thousand “Garb Snarks” just began gnashing their teeth as I wrote that, but it’s how I truly feel. (And stop that. It's bad for your teeth!)
Scott

Showing posts with label hand sewing. Show all posts
Showing posts with label hand sewing. Show all posts
05 March 2008
Collaring (Redux)

It's the 'grown-on' collar (as the Tudor Tailor ladies call it) that is a collar cut-in-a-piece with the body pieces of the doublet (and frequently cussed-in-a-piece for good measure). My troubles last time I messed with this consarn thing led me back to my original source for this, The Tailor's Pattern Book by Juan de Alcega. Alcega pretty clearly lays out the pieces I've drafted for my doublets for years now. Front, side, back, curved sleeves and... wait a minute... a curved collar!? (far right, top row)
 Odd. I've never noticed that before. Going back through the men's renaissance clothing patterns I have in my library, neither does anyone else. All of the patterns I've reviewed have the collars either entirely separate, or the front pieces are cut from straight rectangles...
So maybe that's the secret? It stands to reason that the off-square piece would be easier to ease into the curve of the neck and account for issues as they crop up.
Final Thoughts Before Sewing...
- I decided to go with the patterned white velvet I showed a picture of earlier. I liked it better than any of the others I looked at.
- I did an informal pole on one of the costuming sites over at Tribe.net and overwhelmingly people expressed a preference for hand-sewing only when it would be glaringly obvious if it wasn't or they couldn't avoid it. So for the record, I'm aiming for the happy meeting between hidden machine stitching and visible hand-stitching.
- I'm going to figure out that damn collar or I'm gonna quit show business.
So it begins...
Using the hotrod, the body of the doublet goes together quickly... all nice long seams.
After messing with this &$@% cotton velvet for a bit I came to the realization that I was going to need to reinforce some of the seams that bear the greatest amount of stress. Janet Arnold, thankfully, shows this practice in many of the garments she examined. Some of them look rather like patchwork quilts on the inside with all the padding, reinforcing tapes, et al. Here's a glimpse of what that looks like...
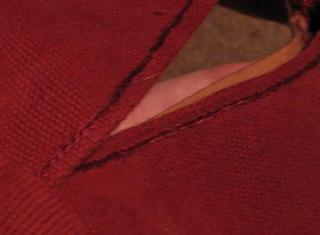
 This is the inside of the shoulder seam with the lining herringbone stitched into place. The canvas will not only reinforce the seam, but also help stiffen the collar.
 Speaking of collars, I cut my two front pieces and they are decidedly un-square. With two layers of cotton batting padstitched into place, I'm ready to give it a go...
This is the first fitting, with Tigger doing the honors. (Kristin was using her dress dummy, what can I say? I improvised.)

When I'm wearing it (instead of the Tigger), the pucker isn't there either... well, mostly. By cutting the collar off-square, and indeed curving the piece - at least a little - I had more going for me as I eased the piece into the body of the doublet.
As you can see, there's some residual pull across the back of the neck in the picture below, but a bit more tailoring on the next one and I'm there.

It's almost time to get down to hand-sewing and our next hand-stitch... the Herringbone.
30 July 2007
Mad as a...
I busted a rib last week. Bad pain. No sleep. Good drugs, though! Henceforth shall I be known as Vic Odin, private eye... okay if you've been living in my head the past week or so, that's hysterically funny. Otherwise probably not so much.
So anyway, as you've seen from the handsewing I've been doing, I've been couch-bound for the better part of a week now and still the needle keeps pulling thread. I can't really lean over to cut out new patterns much so when Kristin - my saintly wife with patience like Job - isn't home to cut things out for me, I'm stuck with either small projects or things that have already been cut out to work on. Or I can surf the internet, which I actually don't so much like doing.
Luckily for me, awhile back my wife asked our friends to donate scraps to a project she was working on and the scraps came pouring out of every costumer we knew. Calabash now has a coat that boasts a sample of just about every bodice in the faire (Woo Woo!!) and we have a big bucket o' random scrappage. Oh, what to do with these odd-size small bits of fabric? Hmmmm... What garby bit of business usually utilize small pattern pieces?
One of the first things we see, one of the prime things we complain about reenactors ignoring, hats. I love hats in general, though I've never really enjoyed making them before. Now that I'm under the influence of the hand-sewing bug and my buddy Vic, I decided what the hell. The pieces are small enough to cut out on my lap and there's plenty of oddments of wool!
Calabash is Venetian and came to Scotland (the site of our faire) by way of Paris in the retinue of Her Most Royal Majesty, Queen Mary of Scots. Yet he's never worn much in the way of garb that really told this tale. So it is with this in mind that I turned my hand to hats...
I like to think of this as my Venetian Dockworker beanie. The pattern was modified from the one at the link above. The authoress of the Renaissance Tailor website describes as a Russian hat. So if anyone quizzes me on it, I got it from one of the Muscovy Trading lads when I was in London on a mission for the queen. There's a little machine stitching holding the upturned brim to the main body of the hat, the rest was handstitched. The pin is a winged lion that I've had for quite some time, symbol of La Serenissima (Venice).
This is a sort of floppy-brimmed Italian bonnet. It's done up in scrap wool that I pieced together to make large enough pieces for the pattern. Small, delicate stitches. The crown is lined in greenish linen and cartridge-pleated into the brim. There are no machine stitches on this hat. (I'm rather proud of that). Small glass pearls are interspersed into the gathers, alternating with some stone beads and metal beads.
The two websites linked above gave me the impetus I needed to make two hats (respectively) though as ever I've worked them as variations on the theme. Their directions were so good I feel that I cannot improve on the theme in those two regards, so I encourage the millinerily-inclined rennie to head to one or the other for the tutorials.
It's fun making hats. I especially like digging through my collection of odd pins to find suitable adornment for the feathers. I've been trying to steer away from the ubiquitous pheasants and ostriches, keeping in mind that Calabash may be a member of the court but he's really not noble. He's a bounder and a bit of a cad who attached himself to Mary in Paris and has followed her since, trading on her patronage like a true Renaissance Man.
Washington Renaissance Fantasy Faire is less than a week away!
Huzzah! (ouch! Gonna go back to the couch now...)
So anyway, as you've seen from the handsewing I've been doing, I've been couch-bound for the better part of a week now and still the needle keeps pulling thread. I can't really lean over to cut out new patterns much so when Kristin - my saintly wife with patience like Job - isn't home to cut things out for me, I'm stuck with either small projects or things that have already been cut out to work on. Or I can surf the internet, which I actually don't so much like doing.
Luckily for me, awhile back my wife asked our friends to donate scraps to a project she was working on and the scraps came pouring out of every costumer we knew. Calabash now has a coat that boasts a sample of just about every bodice in the faire (Woo Woo!!) and we have a big bucket o' random scrappage. Oh, what to do with these odd-size small bits of fabric? Hmmmm... What garby bit of business usually utilize small pattern pieces?
One of the first things we see, one of the prime things we complain about reenactors ignoring, hats. I love hats in general, though I've never really enjoyed making them before. Now that I'm under the influence of the hand-sewing bug and my buddy Vic, I decided what the hell. The pieces are small enough to cut out on my lap and there's plenty of oddments of wool!
Calabash is Venetian and came to Scotland (the site of our faire) by way of Paris in the retinue of Her Most Royal Majesty, Queen Mary of Scots. Yet he's never worn much in the way of garb that really told this tale. So it is with this in mind that I turned my hand to hats...

I like to think of this as my Venetian Dockworker beanie. The pattern was modified from the one at the link above. The authoress of the Renaissance Tailor website describes as a Russian hat. So if anyone quizzes me on it, I got it from one of the Muscovy Trading lads when I was in London on a mission for the queen. There's a little machine stitching holding the upturned brim to the main body of the hat, the rest was handstitched. The pin is a winged lion that I've had for quite some time, symbol of La Serenissima (Venice).

This is a sort of floppy-brimmed Italian bonnet. It's done up in scrap wool that I pieced together to make large enough pieces for the pattern. Small, delicate stitches. The crown is lined in greenish linen and cartridge-pleated into the brim. There are no machine stitches on this hat. (I'm rather proud of that). Small glass pearls are interspersed into the gathers, alternating with some stone beads and metal beads.
The two websites linked above gave me the impetus I needed to make two hats (respectively) though as ever I've worked them as variations on the theme. Their directions were so good I feel that I cannot improve on the theme in those two regards, so I encourage the millinerily-inclined rennie to head to one or the other for the tutorials.
It's fun making hats. I especially like digging through my collection of odd pins to find suitable adornment for the feathers. I've been trying to steer away from the ubiquitous pheasants and ostriches, keeping in mind that Calabash may be a member of the court but he's really not noble. He's a bounder and a bit of a cad who attached himself to Mary in Paris and has followed her since, trading on her patronage like a true Renaissance Man.
Washington Renaissance Fantasy Faire is less than a week away!
Huzzah! (ouch! Gonna go back to the couch now...)
27 July 2007
Buttoning Up - Part One
There are three methods of making your own period buttons that I am going to discuss.
- Soft Buttons made from fabric scraps
- Thread-covered buttons with a wooden core
- Buttons fashioned from beads

Of all the buttons I've experimented with, this is by far the easiest to master and the quickest to make. All it takes is a little practice (which is a lie, I fooled around with this for quite awhile before I consistently got spheres) some basic stitches and scraps of your "fashion" fabric!
Please note: There are many places to learn to do this. Tudor Tailor has some instructions, as does the fantastic Renaissance Tailor website. Both are illustrated and both contributed in some fashion to me learning how to do this prior to posting this tutorial here. I'm putting this up not because it's never been done elsewhere, but because no one I've found has done this with actual step-by-step photos and even though illustrations are helpful, I've always found it more comforting undertaking something new to see it laid out in actual pictures. Keep in mind that I'm a trained illustrator when you read that. So here we go...
One
If you're using a light fabric such as the linen I used on this doublet or even a light woolen, cut the fabric into squares approximately one inch wide. The Tudor Tailor advises using the bottom of a thread spool as a guide, but considering that there no longer seems to be a standard size for this, I came up with the dimension of one inch as making a finished size and firmness that I'm happy with.

NOTE: when using a heavier fabric, such as canvas or even a wool flannel for this, you might want to nip off the edges and make a circle as shown below or it'll be too bulky later when the time comes to stuff it.

Two
Using a piece of thread roughly a foot long (you want a little extra) run a circle of stitches around the center of the square as shown above. Keep the stitches as even as possible and keep in mind that you're going to be using these to gather the fabric into a ball, so don't make them too tight or they'll do you little good when the time comes.

ThreeDraw up the gathering stitches until the square looks like a little bag. Don't pull it tight, though until you...
 Four
Four...stuff the corners and edges inside. Then draw it as tight as you can without tearing or distorting the fabric. (I imagine great care would be needed if working with silk) Take the remaining tail of thread and sew some stay stitches into the resulting ball to keep it in a ball shape.

Five
Working from the bottom (the wrinkly bit) sew back and forth across the axis of the ball three times, leaving the stitches loose, forming a loop which will be used to secure the button to your garment. Gather the three into a single strand and go over them using a button hole stitch as shown below.
 Six
SixRepeat as often as necessary and sew them on...

26 July 2007
Hold the Mustard!
Changing course now, just a little bit. My apologies for the lengthy delay in getting back on course. I you are still with me after all this time, I give you thanks. If you are new, having found me by way of my presence on Tribe.net or elsewhere, then welcome and well met! You come at the turning of the tide.
 Note the divot I carved into the tip of my wooden thimble in the picture above.
It's especially useful when sewing through canvas or leather. Since I
made that adjustment, I've reduced considerably the number of
slipped-needle injuries I sustain in a project like this.
Since we began this journey, the book Tudor Tailor was released. For those who have not yet read it, the book goes a long way toward pulling back the curtain on certain salient aspects of all we strive for, sort of a user's guide to Patterns of Fashion in a very real way. But I came here not to sell you books, I came hence to tell you that the book changed my mind in a couple of ways on the final outcome I hope to achieve with this garment and certain long-held beliefs on the construction of period-seeming garments for the reenactment set.

And so I resolve to complete the journey, a journey now refined by the passage of time and the introspection brought on by long hours wreathed in plaster dust as we continue to remodel our home, by the rumination over illness and injury, and by the letter R.
I have long thought that handsewing was just a pain in the @$ and little more good could be said of it. I was wrong. My wife tried to tell me that it had its place, and I thought she meant in areas were a machine could not go. What she really meant was that there were marked differences in the results achieved by the slow & steady approach versus sticking layers of fabric under the frantic needle of the Hotrod. I stand corrected.
As such have just completed the garment I began here this long while ago. When last we met, I was using plum-coloured canvas to draft a new pattern for a mustard-colored middle class doublet. A close-fitting affair with set-in sleeves and a grown-in collar.
Changes:
(Note: I will be making a new jerkin of green wool soon using this same method and will go in-depth on that, perhaps sometime this fall)
 The more seams you have, the small pieces you piece from,
the more points of adjustment you have to work with, and the
better fit you can manage in your clothing.
The piecing of doublets is a subject I have been thinking on a great deal this past year. I have studied every painting from the period I could get my hands on, perused a borrowed copy of Alcega, read Tudor Tailor and internally worked the seams in my head during the quiet moments of the morning when the novel wasn't singing to me and sleep was elusive.
Doublets of our period seem to have been made from many small pieces, some smaller than others. Leather doublets seemed to be even more prone to this almost quilt-like piecing strategy. It's all about making as many clothes from one ell of cloth as possible, you see, The smaller the pieces, the more you can fit them on the cloth ere you cut, like the pieces of a puzzle. The period tailor books were full of illustrations of how best to eke the most out of a single length of fabric. And so shall it be with me...
 Note the unaligned seams where the sleeve meets the doublet body.
These became rarer as more and more machines replaced tailors.
During the industrial revolution, patterning of clothing changed to accomodate the machines being used to manufacture them. Seams such as these would slow production, so they were aligned so as to be sewn in a single pass, or as few passes as possible. So it is that machine sewing of Renaissance clothing seems so awkward, the machines constrained.
 When easing curved seams I use as few pins as possible, giving me
as much play as I can to stretch and turn the fabric as I sew. This
allows better alignment of layers, I think, and a nicer finished look
to the final garment.
I am not so reduced that I will set aside my hotrod entirely, but it will definitely be utilized in the main for sewing long straight seams, or pieces that will be turned and the machine sewing hidden. As I went along in this project, I was surprised to find that I did more and more by hand as I developed a feel for it, and acquired a rhythm for the movement of the needle, thread, and beeswax.
I must cogitate some more, and I've buttons to make and buttonholes to sew as well. I'll be back soon with more pictures and more in-depth maundering of the like you're used to on the myriad subjects that spring to mind as I stitch...
Next: Making Buttons!!
 Note the divot I carved into the tip of my wooden thimble in the picture above.
It's especially useful when sewing through canvas or leather. Since I
made that adjustment, I've reduced considerably the number of
slipped-needle injuries I sustain in a project like this.
Since we began this journey, the book Tudor Tailor was released. For those who have not yet read it, the book goes a long way toward pulling back the curtain on certain salient aspects of all we strive for, sort of a user's guide to Patterns of Fashion in a very real way. But I came here not to sell you books, I came hence to tell you that the book changed my mind in a couple of ways on the final outcome I hope to achieve with this garment and certain long-held beliefs on the construction of period-seeming garments for the reenactment set.

And so I resolve to complete the journey, a journey now refined by the passage of time and the introspection brought on by long hours wreathed in plaster dust as we continue to remodel our home, by the rumination over illness and injury, and by the letter R.
I have long thought that handsewing was just a pain in the @$ and little more good could be said of it. I was wrong. My wife tried to tell me that it had its place, and I thought she meant in areas were a machine could not go. What she really meant was that there were marked differences in the results achieved by the slow & steady approach versus sticking layers of fabric under the frantic needle of the Hotrod. I stand corrected.
As such have just completed the garment I began here this long while ago. When last we met, I was using plum-coloured canvas to draft a new pattern for a mustard-colored middle class doublet. A close-fitting affair with set-in sleeves and a grown-in collar.
Changes:
- I set aside the grown-in collar after the difficulties I experienced with the rust-colored jerkin. I never completely resolved the pucker at the back and muslin after muslin repeated the problem, so for now I have set aside the notion entirely.
- I came into a stash of 100% linen in natural and a pale green. I have traded in the mustard-coloured brushed cotton for the natural linen as an outer material and the pale green as lining.
- I have - for this project as an experiment - set aside my usual Pellon fusible interfacing that I have hitherto used in lieu of canvas interlining and subsituted it with canvas 'Duck' since I couldn't find anyone selling proper fustian (a heavy cotton/linen blend).
- I will be making cloth buttons out of scrap linen instead of using the wooden bead buttons I used on the rust-colored jerkin and was intending to use again on the doublet.
(Note: I will be making a new jerkin of green wool soon using this same method and will go in-depth on that, perhaps sometime this fall)
 The more seams you have, the small pieces you piece from,
the more points of adjustment you have to work with, and the
better fit you can manage in your clothing.
The piecing of doublets is a subject I have been thinking on a great deal this past year. I have studied every painting from the period I could get my hands on, perused a borrowed copy of Alcega, read Tudor Tailor and internally worked the seams in my head during the quiet moments of the morning when the novel wasn't singing to me and sleep was elusive.
Doublets of our period seem to have been made from many small pieces, some smaller than others. Leather doublets seemed to be even more prone to this almost quilt-like piecing strategy. It's all about making as many clothes from one ell of cloth as possible, you see, The smaller the pieces, the more you can fit them on the cloth ere you cut, like the pieces of a puzzle. The period tailor books were full of illustrations of how best to eke the most out of a single length of fabric. And so shall it be with me...
 Note the unaligned seams where the sleeve meets the doublet body.
These became rarer as more and more machines replaced tailors.
During the industrial revolution, patterning of clothing changed to accomodate the machines being used to manufacture them. Seams such as these would slow production, so they were aligned so as to be sewn in a single pass, or as few passes as possible. So it is that machine sewing of Renaissance clothing seems so awkward, the machines constrained.
 When easing curved seams I use as few pins as possible, giving me
as much play as I can to stretch and turn the fabric as I sew. This
allows better alignment of layers, I think, and a nicer finished look
to the final garment.
I am not so reduced that I will set aside my hotrod entirely, but it will definitely be utilized in the main for sewing long straight seams, or pieces that will be turned and the machine sewing hidden. As I went along in this project, I was surprised to find that I did more and more by hand as I developed a feel for it, and acquired a rhythm for the movement of the needle, thread, and beeswax.
I must cogitate some more, and I've buttons to make and buttonholes to sew as well. I'll be back soon with more pictures and more in-depth maundering of the like you're used to on the myriad subjects that spring to mind as I stitch...
Next: Making Buttons!!
20 October 2005
Great panes...
Disclaimer... If I dug though my old text books from art school I could probably come up with a better name for this feature than 'sleevelet'. But the books aren't in a convenient place at the moment, and I'm too lazy. Not to mention that in the big picture, nomenclature doesn't seem all that important at the moment. If anyone has a 'proper' term for it at their fingertips they can email it to me, but in the meantime I'm going to stick with 'paned sleevelet'
I finished the rows of straight chain stitches on the panes and I've assembled the sleevelets. Below is a pic of the cuff with the panes sewn into it before I turned it and tacked it down. The cuff piece has a arch to it, which is why I clipped the edges prior to turning as you can see.
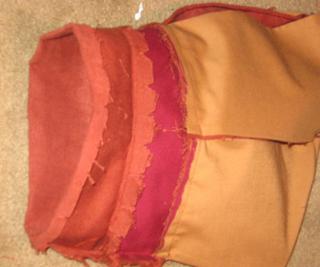
The dark burgandy layer is the canvas I used to interline the pieces. Yes, I know, I said something heartfelt in a previous post about interfacing being easier than interlining. Keep in mind the other things I said about only using modern conveniences where I can get away with it. In this case I think that modern interfacing would make the lines too stiff and starched-looking. Since an interlining is essentially only attached where the stitches hold it, it can give pieces like the panes and cuff of my sleevelet structure without forcing them to hold thier shape to an almost starched extent.


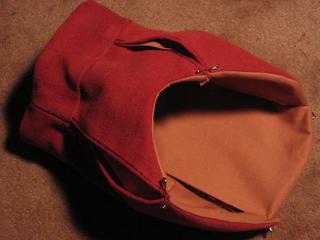
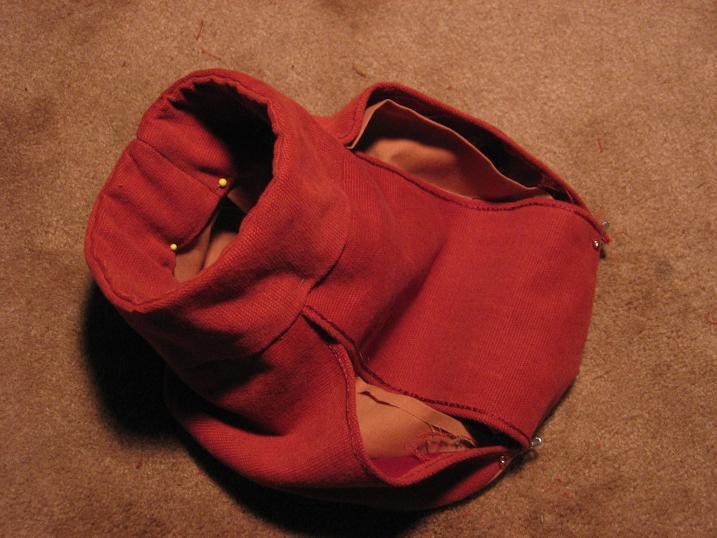
Trimmed and turned. At the moment it's just pinned together to check the shape and see if adjustments need to be made before there are too many seams to pull.
This is the scrye where it will eventually be joined to the body of the doublet.
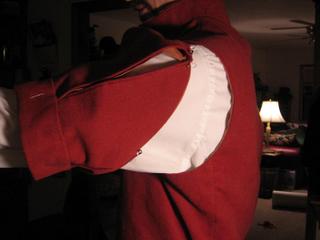
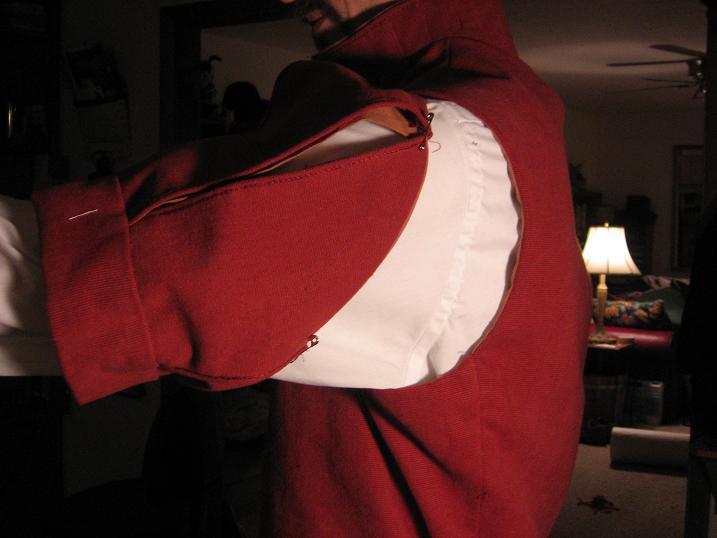
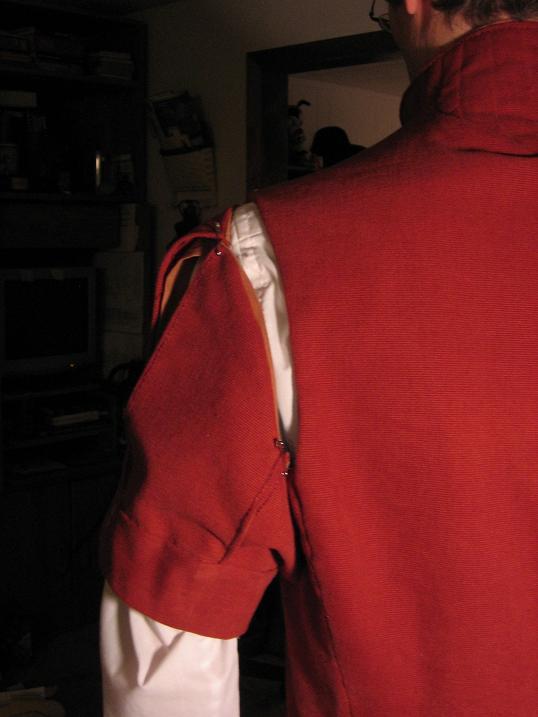
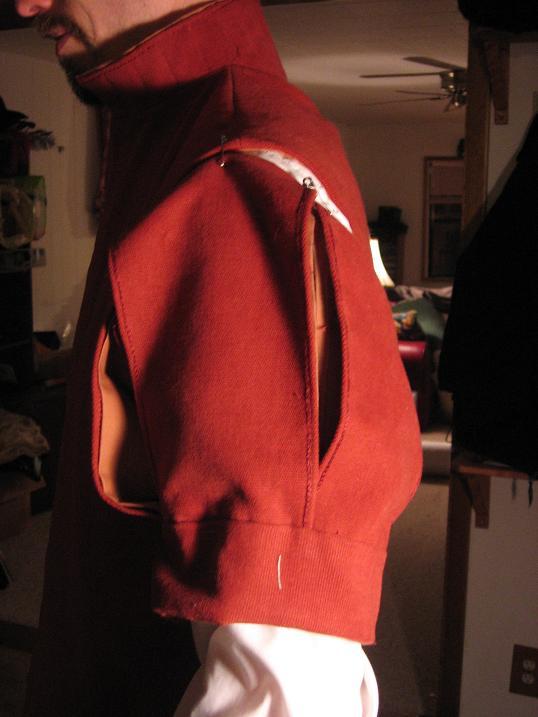
Since I've never made a sleeve treatment such as this one, I thought it meet that I should pin and pose, trying out the thing and making 99.9% sure I got it right before I actually sewed it on. The sleeves of the doublet will be laced on, because I prefer that method overall, but in the Moroni painting the jerkin I am copying looks like it's been sewn into the armscrye. This is unusual according to most of my reading, but the painting shows no visible signs of lacing or points holding the sleevelets in place, so neither will this jerkin - or the final one.
Note: I didn't have one of my usual 'renaissance shirts' handy, so I'm wearing a white dress shirt in these photos. It doesn't really matter because at this point I'm just testing the angle. The 'bulky armpit' tests will come later when it's tacked on a little more securely and I can get a real feel for how it will go. The nice thing about panes is that they can be moved to expand or contract around as much or as little thickness of fabric as I am likely to find going through that armhole anytime soon.
At Extension
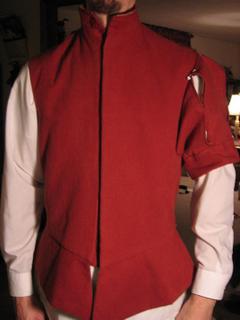
Front

Shoulder back

Shoulder profile
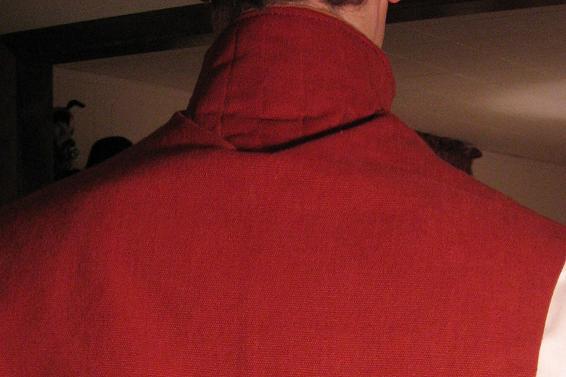
I'm pleased so far with the similarities with the jerkin in the painting. There is a small issue at the back of the neck, however. It is possible that partially quilting might not work in the long-run. The point where the quilting stops has a pucker that just won't go away. I'm still looking for solutions to this (other than quilting the whole damn thing, of course). Maybe some of that cheap ultra-flexible boning they sell at fabric stores or some broom straw or something... I'm sure I'll figure it out eventually.
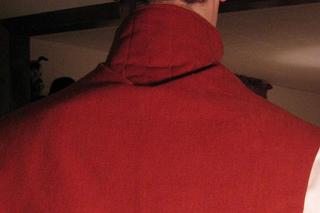
No matter how many times you've done this, the course of sewing garb never runs completely smooth.

I finished the rows of straight chain stitches on the panes and I've assembled the sleevelets. Below is a pic of the cuff with the panes sewn into it before I turned it and tacked it down. The cuff piece has a arch to it, which is why I clipped the edges prior to turning as you can see.

The dark burgandy layer is the canvas I used to interline the pieces. Yes, I know, I said something heartfelt in a previous post about interfacing being easier than interlining. Keep in mind the other things I said about only using modern conveniences where I can get away with it. In this case I think that modern interfacing would make the lines too stiff and starched-looking. Since an interlining is essentially only attached where the stitches hold it, it can give pieces like the panes and cuff of my sleevelet structure without forcing them to hold thier shape to an almost starched extent.

Trimmed and turned. At the moment it's just pinned together to check the shape and see if adjustments need to be made before there are too many seams to pull.

This is the scrye where it will eventually be joined to the body of the doublet.
Since I've never made a sleeve treatment such as this one, I thought it meet that I should pin and pose, trying out the thing and making 99.9% sure I got it right before I actually sewed it on. The sleeves of the doublet will be laced on, because I prefer that method overall, but in the Moroni painting the jerkin I am copying looks like it's been sewn into the armscrye. This is unusual according to most of my reading, but the painting shows no visible signs of lacing or points holding the sleevelets in place, so neither will this jerkin - or the final one.
Note: I didn't have one of my usual 'renaissance shirts' handy, so I'm wearing a white dress shirt in these photos. It doesn't really matter because at this point I'm just testing the angle. The 'bulky armpit' tests will come later when it's tacked on a little more securely and I can get a real feel for how it will go. The nice thing about panes is that they can be moved to expand or contract around as much or as little thickness of fabric as I am likely to find going through that armhole anytime soon.
At Extension

Front
Shoulder back
Shoulder profile
I'm pleased so far with the similarities with the jerkin in the painting. There is a small issue at the back of the neck, however. It is possible that partially quilting might not work in the long-run. The point where the quilting stops has a pucker that just won't go away. I'm still looking for solutions to this (other than quilting the whole damn thing, of course). Maybe some of that cheap ultra-flexible boning they sell at fabric stores or some broom straw or something... I'm sure I'll figure it out eventually.
No matter how many times you've done this, the course of sewing garb never runs completely smooth.
Subscribe to:
Posts (Atom)