Showing posts with label Patterns. Show all posts

11 May 2012

Leather jerkin: Pattern layout & Preparation

Today, I finally get off my duff and begin my leather jerkin project...

Patterning, Plotting, and Planning:Orienting pattern pieces on a piece of cloth is fairly straightforward. Cloth is woven with a definite grid of warp and weft fibers, so you know what you're going to get. Stretch on a piece of cloth runs on the diagonal (bias) because the fibers slide more easily diagonally than they do laterally.

Because leather was once the skin of an animal, it has its own concerns where placement of pattern pieces are concerned. Leather has a lot of give to it and while there are definitely directions in which the leather stretches better than in other directions, those are not necessarily uniform across the entire hide. As discussed in the posts on mask making, the areas nearest the belly of the animal are the stretchiest.

Alcega's doublet pattern layout on a rather narrow width of cloth.

There are a lot of other factors that play into these considerations, including the origin of the leather (cow or calf, sheep or lamb, deer or doe... etcetera.) Breed, gender, and age are huge considerations in choosing leather. Female and/or younger animals have suppler hides because their skin is higher in collagen, same as my skin is not as supple as a lad half my age. Even on leathers from the same animal, how the leather was tanned will be another consideration.

This is all compounded by the fact that unlike the cloth that comes from your local weaver, leather thickness is not uniform across the whole of the hide. So pattern pieces should be oriented so that the thinner places are along the outer edges where you were going to have to skive away leather anyway.

Pattern Placement and Cutting:
Holes you make in the leather won't 'heal' like they do in cloth. So we can't really use pins. I know some folks use them in the seam allowance, but I don't like to do so. If you feel that you cannot get by without some pins, then to the seam allowances with you!

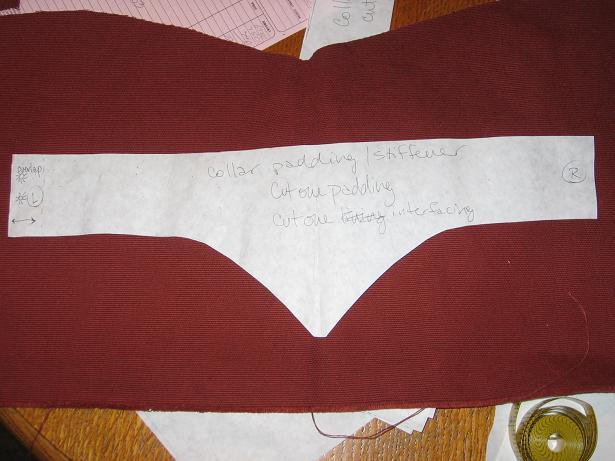
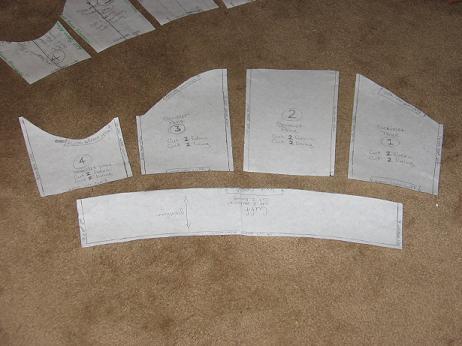
I lay the pattern pieces on the back side of the leather and either tape them or weight them down and trace around them.


Note the way I oriented the pattern pieces in the photo above, taking the most advantage of areas of leather free of things like bullet holes and other imperfections. Unless you have in your project budget to buy multiple five-star hides and use the best of each, some imperfections are par for the course. They add character as far as I'm concerned.

Also, note how the stretchier areas at the edges are kept to the areas that will need to be stretchier and/or thinner on the final garment.

Stabilizing the Leather:
There are ways to get leather to be more stable as a final garment and I'm going to use a flat lining technique with a slightly... okay, very modern twist.

Once upon a time, I bought a leather sport coat at a thrift store and took it apart to use the leather for something else. I was surprised to discover that across the whole of the garment, the leather had been glued to a piece of lightweight interfacing.

The interfacing peeled right off, as pellon is wont to do when thumbnail is applied, but it was a bit of an "Aha!" moment for me.

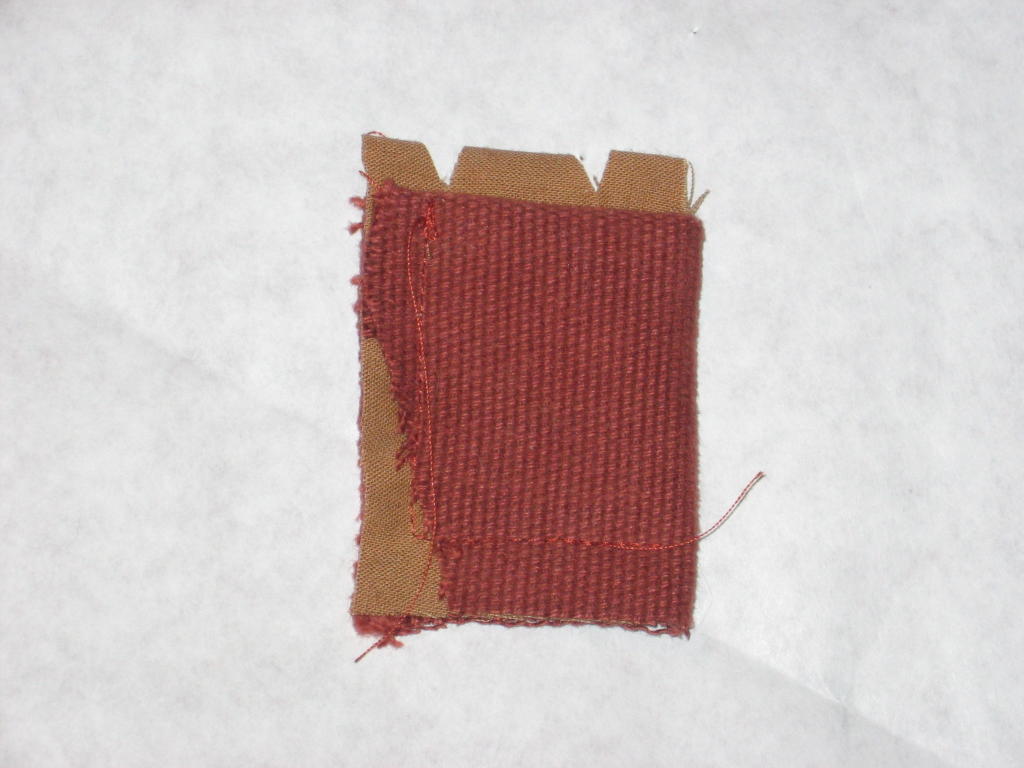
A jerkin needs to be a fairly structural garment, even if made from a lighter leather. Because I'm using a very stretchy skin, I plan to adhere my leather to a denim-weight canvas using a spray adhesive. This will bond the two together so that I can treat it as one layer. This adhesion will be backed up with stitches later, but the adhesive allows me to work with it fairly roughly (note that I've used a chisel to slash one of the test bits below.)


You can use almost anything for this from lightweight pellon to a cheaper hide if you want. It all depends upon how much structure you want or need to lend your final garment.

The final pieces. Cut out and stabilized.


Is this a period technique?
Well, 3M was founded in 1902 and probably didn't start making aerosol adhesives until the 1950's at a guess.

Flatlining certainly is. Using layers of fabric to reinforce and stiffen areas of cloth and leather garments, certainly. Gluing it on?  I don't really know. 

If you wanted a more period-appropriate method, do the same thing with linen or hemp canvas, adhered with hide glue. It would accomplish much the same thing, but hide glue is messy and much stiffer than the 3M spray product I used here. Which is why I opt for the modern convenience.

The adhesion provided by the glue will allow the two pieces to move as one, each lending the other its greatest strength. The denim lends the leather body and the leather (and the glue) keep the denim from fraying out too much where I've slashed it.

I'll talk more about pinking and slashing in another post.

28 February 2012

Designing a Basic Kit for Reenactors

I've been sick, and as we all know, sickness leads to sewing.

I'm currently working out a set of easy instructions for basic start-up kit that would get a male actor from zero to fully costumed for as little money as possible. The kit would center around a simple outfit of shirt, jerkin, Venetians or galligaskins, and shoes. 

Conversations with potential actors, often center around two issues:
  1. Start-up costs: All of the things a beginning actor needs seems daunting when you are starting from zero. Along with this post about "feast gear" and this one about modifying shoes, this set of simple patterns will complete the kit for any newbie.
  2. "I'm not going to wear that." (Usually said while pointing to someone in short-short paned trunkhose displaying a lot of leg.)  The culture shock is sometimes too much for guys who grew up in the jeans & tee shirt era.  Because Venetians come down below the knee, they are the least threatening of the period-appropriate garb available to us; the least likely to scare off the potential actor who recoils at the thought of putting on a pair of tights or even thigh-high hosen.

If we get someone involved in this pastime with the minimum headache, they almost inevitably begin upgrading their kit. From these simple beginnings, most can be expected to begin to branch out into more intricate costumes as their characters progress. 

The goals for this project are:
  1. Get new actors into a period-appropriate (1560-1580) costume for as little money as possible.
  2. To teach some basic pattern-drafting and further my goal of getting more men to sew.
  3. To get actors to shift more of their initial expenditure into period-appropriate fabrics.
  4. To further the ideal that we are making clothes, not costumes*.

All of this will become a kit that I dispense to my new guildmembers, as well as a class I will teach for the Washington Midsummer Renaissance Faire (because they've asked me to) and anyone else who wants to pay me to come speak to their group.  My rates will be very reasonable... I don't know what that means yet, but whatever they turn out to be, they will be very reasonable, I assure you.

One of the laudable aspects of Venetians (from the standpoint of a new reenactor) is that
they have what we now consider a standard trouser fly. No codpiece necessary.
Because I wanted to illustrate some simple ways to dress-up a simple pattern (and because
I just can't leave anything alone,) I added some very basic chainstitch embroidery to the legs.

This blog will play host to those patterns and yes, they will be available as a free download. I will probably even get my wife to videotape the class so that I can send it to people and post it here.

See you soon with more pictures and information...

-Scott

--------------
*
Yes, I am aware that "costume" is the accurate and appropriate nomenclature for the clothing worn by a specific culture at a specific time. I further know that "garb" makes some people's teeth itch. I use it anyway. One of my missions is to make this pastime accessible to all, and we are combating an entrenched cultural connotation of the word "costume" with the word "Halloween". The word "Garb" is not only a period-appropriate word (Shakespeare uses it) it also specifically connotes period clothing, especially in reenactor circles. There are those whose mission it is to erase "garb" from the reenactor's lexicon, mostly because the academic community gets sniffy if they catch you using the term. Good for them. I, however, could not possibly care less what the academic community thinks of me. Academic accolades are not my goal here. 

15 October 2005

Beginner's Garb Tips

One of the reasons I decided to do this 'doublet Diary" was because when I got started there wasn't much out there geared toward gettign a fellow started. That included some of the basic stuff like pattern drafting and the like. So, I will periodically be posting "Tips O' The Moment" for the newbie garbmongers among us. The rest of you can skip these posts if you like or laugh at the way I do things.

Here's the facts... despite certain key similarities, we all tend to take slightly different paths to arrive at roughly the same destination. That is to say: This is how I do it, I'm not an expert, just experienced. Do it my way, don't do it my way, it's your choice. The success or failure of your sewing project is in your hands. I'll tell you my route to the summit but you have to climb the mountain yourself.

Enough metaphors! Let's sew!


TIP 1: That's not a big roll of toilet paper or a really small kitten. It's my eleven pound 6-month-old kitten Dusty illustrating the rough size of a roll of butcher paper I picked up at my local Costco warehouse store. If you don't have a Costco, go to Sam's Club or Pace or whatever. Odds are they sell this stuff by the roll. I think it cost me ten bucks two years ago. My wife & I both use it and we still have this much left. If you don't use it to light the woodstove or as a cat toy, it'll last you awhile.

Even if you are using a commercial pattern (and there are several good ones out there) don't cut out the flimsy tissue paper pattern that comes with it. Trace your pattern pieces on heavier paper (like butcher paper) and cut those out, saving your tissue pattern for the next time you want to make a garment and this time want an extra two inches on the left front piece or whatever. Everytime you alter your pattern from what it was, trace out a new one or you'll be sorry. Each minor alteration requires minute changes at other points that you may not be aware of until its too late to go back (ie after you've cut the expensive fabric.)

TIP 2: Which brings me to another point: "Do as I say, not as I do..."
I mentioned earlier being reckless and not doing a muslin for this project. I can get away with this because this will be the umpteenth doublet I've made. Even that's not really a good enough excuse, though, because even the most experienced tailor makes mistakes once in awhile. Even the pros rarely just sit down at the machine and wing it. I'm doing it anyway because the entire outfit is really a prototype for another outfit. I am confident enough in my abilities to anticipate problems and know that I have the MacGuyvering skill to roll with it and still turn out a suitably wearable garment. It's a gamble, but I feel pretty comfortable making it. Also, the mistakes are learning experiences and I have plenty to make before I put shears to velvet.

Don't do this until you're experienced enough to make the gamble with your eyes open. Fabric dollars add up fast and mistakes can be costly if you don't know how or can't correct them after the fact.

All that said, I advise making a complete mockup of your garment in muslin and trying it on before you cut even so much as the lining fabric. Better yet, make it out of scrap canvas in a weight and give similar to the final fabric you're going to be using.

If it's a doublet or slops, put it on, walk around in it. Do the things you think you're likely to need to do when you're wearing the final product. Can you reach? Stretch? Bend? Squat? Climb Stairs? Do jumpingjacks? Run a marathon? Fence? Swing from a chandelier? Quaff and ale? Fit your cuirass over the doublet? Fit your billowy shirtsleeve through the armhole?

Think of everthing this garment has to put up with and design and alter your design accordingly. You'll feel where it's tightening across the shoulders as you make a few parries and thrusts with your rapier. You'll notice the tightness and lack of give in the crotch as you try to bend down and pick up the cloak you threw across the puddle for your lady. If it's tight, loosen it and try again. Keep making alterations and new mockups until it feels wearable and you're sure the butt isn't going to tear out when you bend over. Then pull the seams and use that one as your final pattern.

HERE is a link to the Sempstress' website. She's great! This is where she explains in great detail how to make your pattern from scratch. I recommend this for your second doublet. Make the first one with a commercial pattern and wear it for awhile. Figure out what you want from it. Then go back and make it up from scratch.

Good luck!
Let me know how it turns out!
Scott

On patterns and planning...

It has occurred to me that these are my favorite set of juggling balls (pictured below)… My how those colors look familiar!

Hmmmmm, I wonder if subliminally I’m trying to cling to my “Fool” persona? Nah!

Anyway, I’m what a relative of mine calls a “mental sprinter”.
He’s a smart guy and even though he was talking about himself when he said that (honest!) he couldn’t have described my mental state better with regard to sewing. That is to day that once I get going on something I have to get it over with quickly or I’ll get tired of it and never finish. It's a nice way of saying I like to procrastinate the fun stuff. That’s why this one is going so fast. If I embroider it later, you can bet that part will slow down and take much longer because though I enjoy the effects achieved by embroidery, I find the actual execution of it to be pretty tedious.

I've been toying with the embellishment options. I rather like the effect of some of the late period doublets shown in Janet Arnold's Patterns of Fashion, especially the ones with quilting and tabbed edgework. I've always accomplished the tabbing with bias strips in the past but Janet Arnold describes it in one passage as a silk piece that was folded and sewn into the seam and then slashed or clipped to add texture and visual interest.

Below is a small experiment in how to pull that off without using fray-check to keep it from ravelling.


before washing after washing

The cuts are made on the bias, which keeps them from fraying overmuch. The small amount of fuzziness looks okay to me and even adds interest and makes the doublet look less like I just made it (or will once I've made it if you catch my drift). I think I shall keep it simple and just use the cut trim around the collar, though I might use actual silk and do the whole collar and front of the jerkin or doublet on the final project if I can find something with a tight enough weave to resist fraying.


The other collar embellishment (if it can be called that) is the quilting. I want to do an entirely quilted doublet, but I have to wear the darn thing in August so it's a problematic costuming decision for me. To give myself the look and collar control of a quilted doublet, I have decided to quilt just the collar, which will hopefully be facilitated by making the back of the collar integral with the backpiece of the doublet pattern. The oddly shaped pattern piece above is for the quilt batting I shall be using, Warm & Natural two layers. The quilting will follow the chevron contour down the spine.

Hopefully it won't be too hot. I've never quilted anything before so we shall see.


The paned sleevelets have been giving me fits, but I think I have drafted a pattern that will make it work (shown above).

The pattern I use is an old one I drafted six years ago or so with the slight modifications I mentioned earlier. I've decided to be a little reckless and not do a muslin first since I've used the pattern so many times and the alterations I'm making in terms of button plaquette and collar are relatively minor. The skirting will also be longer than I usually go for so it can be belted over with my sword carrier.

Oh yeah! And...


Partly because I am deeply in-touch with my own fallability and partly because my wife is an engineer and she's rubbing off on me (ack! Dilbert cooties!) I will be prototyping this with a middle-class version of the same outfit. The doublet for the initial outfit shall be a mustard yellow with a rust jerkin in a heavy canvas. I will noodle with the pattern quite a bit, and use the canvas jerkin as my prototype for the pattern mods and the doublet as my beta test - so to speak.

Buttons will be the bead-buttons pictured here. (I love this image for some reason). I drove all over greater metropolitan Seattle looking for these so I'd have enough for the doublet and the jerkin! I'm using these because on the final garb I will be using pewter shank buttons cast from extant period examples that I bought online awhile back and have been waiting for an excuse to use. They attach much the same as these and are about the same size so any problems and/or solutions that occur with the beads should apply to the pewter ones.


Other alterations to the pattern I usually use will include:
- Collar will be integral to the back piece of the pattern
- A quilted collar ala Janet Arnold's Patterns of Fashion
- Overlapping front L over R to replace my usual buttonhole plaquette or lacing holes
- Some low-key embroidery just to get the feel for how best to decorate the final piece

Now... really I'm going to bed!
Scott

From the sketchbook to the sewing machine...


(Please note that even though I call this a "Doublet Diary" I will be recording every aspect of the costuming of this piece from head to toe. I now return you to your regularly scheduled Doublet Diary...)

I am about to embark on my most ambitious garb project to date. Hence the desire to document it. My wife & I have decided that we're tired of always being generic "Joe and Jane Elizabethan" so we're going to be branching out. When we are not actively participating in Guild activities with St Brigid's Hearth or if we're Playing Patron to scope our a new faire, we will be far fancier than our typical Elizabethan working class. My wife has caught the Courtesan Costuming Bug and I have have consented to squire her around in a new Italian-inspired creation of my own.

Before your start in on me, yes I know that Venice was independant of Italy and an Imperial power in her own might. Also, the portrait I was noodling with when I drew the sketch above isn't Venetian either, but the overall costuming is very much the flavor I am seeking. When asked, I shall tell folk that I have a Florentine tailor... or that I am the Venetian Trade Ambassador to wherever it is we are visiting. The thing to remember about costuming for Ren Faire (as opposed to other reenactment pursuits and groups) is that you can do anything you can get away with. I tell you good sir, I have traveled the continent and one cannot expect a single set of attire to see a gentleman on his way to... on my way to... where am I again?

That isn't to say I'll be out of period, just out of place. :O)

The planning for this actually began a couple of years ago, but I had a novel to write, a new house to move into and several perfectly suitable outfits for ren faire, so it was back-burnered until a few weeks ago when I began sketching ideas and toying with the original painting as above.

And - just because - new pic! No costume involved, just a snapshot my wife took on the ferry the other day. That's me, always with the nose stuck in a book or a needle stuck in my finger! (Ouch!)

The final outfit will be colored similarly to the colored pencil sketch above, using a much deeper wine red than I had a pencil handy to illustrate and a more muted sagey green than shown as well. The red doublet will be an embroidered open-weave linen and the jerkin a sage cotton velveteen.

I plan to use a pattern I am familiar with, which I drafted ages ago and works for me. One thing I won't be doing is getting into the how-to's of pattern drafting. At least not right away anyway. There are numerous sites dedicated to just that, I suggest Googling them.

More later... I need some sleep!


Scott