
So... my new garb needed a book. A Psalter to be exact.
So I dove into my extensive library and came out with Hand Bookbinding, A Manual of Instruction by Aldren Watson (Dover, 1986 ISBN# 048629157X). Yes I happened to have a manual of bookbinding on the shelf. I'm a rennie and a bibliophile. I also have a book that would allow me to replicate Nelson's Flagship to the last nail. I also came up with a copy of the Vulgate Latin Psalms I printed off a no-longer extant website a few years ago. Good to go.
 Since this is my first book, I decided to bind it blank and make it a sort of journal, just to try my hand at the art and craft of bookbinding and be certain I could do it before I put any real effort into a latin psalter. I never do anything half-way, though, so I spent a bit of time tracking down some scrap leather as well as coming up with a clasp and corners to provide the right look I was going for.
For a few years I've been mulling over the idea of binding a book or two, so over all that time I've collected oddments I thought would be good for the future book I was planning. Sometimes it takes years before I've collected enough in my Venus Flytrap of an imagination to start work. Certainly that's the case here. The corners are box corners I found at a craft store on closeout last year. They're thin enough metal to manipulate a little to make them more suitable for a book. The clasp is a fairly standard La Mode clasp from the fabric store, and the leather strap is leftover from making my rapier hanger a few years ago.
Notes on Nomenclature
I know, I know. Usually I'm not a stickler for nomenclature. 9 out of 10 times this is out of laziness or a general distaste for having to use parenthetical asides to translate tech-talk into laymanspeke. That said, I've been assured that bookbinding simply won't work if you don't know how to talk the talk. I'm skeptical but I'm going to go along with it for now... just in case.
The book will be a small one, an "Octavo" it's called, meaning that the paper making up its pages have been folded in half twice so that - once they are cut - they make eight pages. The cuts were all done by running the back of a butter knife along a creased edge, giving the paper that ragged look which modern binders call the "deckle" which is just a fun word to say. If you do it right, you're left with individual rectangles creased down the center, which are stacked to look like a little pamphlet. The individual section is called a "bifolio" and together they form a "quire" or "signature". The signatures are stacked and sewn to a series of cords using something that looks a lot like a chain stitch. Some books also feature signatures sewn to one another with what looks like a buttonhole stitch.
I will be raiding my wife's supply of resume paper for paper of the correct weight and cotton-rag content. I'm working with 14 signatures of 4 bifolium each. I stacked them and drew a line down the spines of the signatures and then pricked them along the three lines as I will be doing a three-cord binding. The pricks in the paper will allow the sewing to take place without having to force my way through multiple layers of paper with each pass of the needle.
One of the things I found in the magpie stage of
 my bookbinding planning was a frame which - with some suitable modification - makes a smashing good sewing frame for the binding of books. Keeping the cords taut makes sewing to them much easier. (Yes, that link shows a slightly different method than I used here) The dowel along the top allows me to tighten the cords which are secured to the frame by pushpins, crude but effective.
The thread is 100% linen, which I waxed with the little hexagonal block of beeswax you can see in the picture. I picked it up last summer at a farmer's market. Bookbinder's needles can be found a most stores which sell scrapbooking supplies or you can use darning needles and dull the tips. Dull tips keep you from further damaging the paper as you're sewing through it. Waxing the fibers not only make pulling the thread easier, the wax also helps seal the hole in the paper a bit as it's rubbed off, passing through the hole.
Once I had the signatures sewn to the three cords, I pulled it out of the frame and found two suitable boards a little larger on every side than my text block(the stacked and sewn signatures are referred to as the 'text block'). I lined up the cords and then drilled holes in the boards for them to pass through. Most binding was done with either pasteboard or oak boards. Pasteboards were/are a cheap and speedy alternative to woodworking and oak resists warping. I had neither oak nor pasteboard handy so I went with pine. (I might regret it someday but it's an experiment, so it doesn't matter that much to me, to be honest. Remember what I said about prototyping and beta testing my designs?) The pine was sanded, the edges beveled and the wood treated with a hardener.

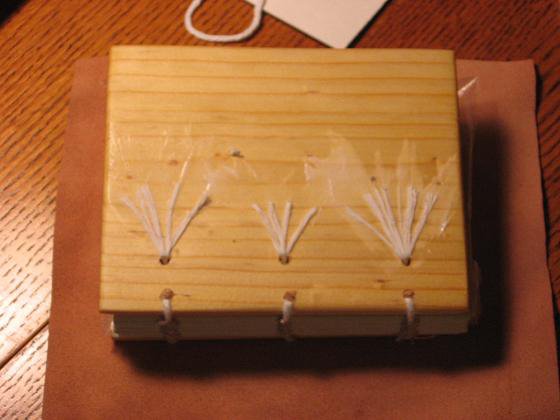 dragged along the edge of a knife to fray them. The frayed ends are then splayed out along the board so as to avoid unsightly lumps beneath the leather that will eventually cover them. This means they are twice secured: once by the pegs and once by the paste sandwiching them between wood and leather. As you can see, I pasted mine down in advance to keep them out of the way until I got around to gluing leather over them.
The leather you can see lying beneath the nascent book in the picture above is the leather I chose. It's a buff leather chosen in keeping with the 'things I had lying around' theme. This used to be a poorly-assembled vest that some RV enthusiast had plastered with patches and stickers from their travels and then sent to Goodwill. I was happy to peel off the stickers, clean the leather and give it a good home in my project box. Now it's a book cover. Wouldn't that RV'er be surprised what happened to their old vest? I love recycling!
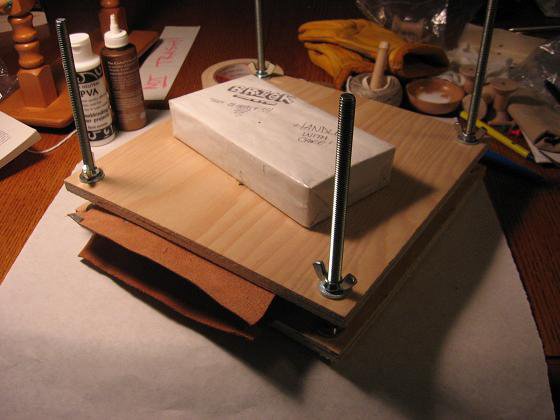
I cobbled together a press out of plywood and lag bolts to use in the gluing portion of the programme. It's based on an enlarged version of a flower press I saw for sale somewhere once upon a time. I figured it would be good for applying strong, gentle and even pressure across the surface of the entire book. The leather is applied only to the front and back using PVA adhesive (see below). I did not glue the spine or the edges, those will be dealt with in good time.
PolyVinylAcetate (PVA)
PVA is what is known as an 'archival' adhesive. I keep it on-hand because it's very useful. Anytime someone uses the term 'archival' it means that it has a nuetral or near-neutral Ph and therefore won't accelerate the adverse effects of aging. One of the reasons old books are deteriorating in our libraries is because the paper and hides used to create them were acidic, as were the glues, inks, sizes, etcetera. The books literally are eating themselves. Animal and starch-based pastes that were used by period binders drew bugs and didn't help matters. I'm opting for a modern solution here, but if you want to be really authentic go here to learn about making wheat paste which IMHO is better (less smelly & substantially less annoying to make) than fish glue.

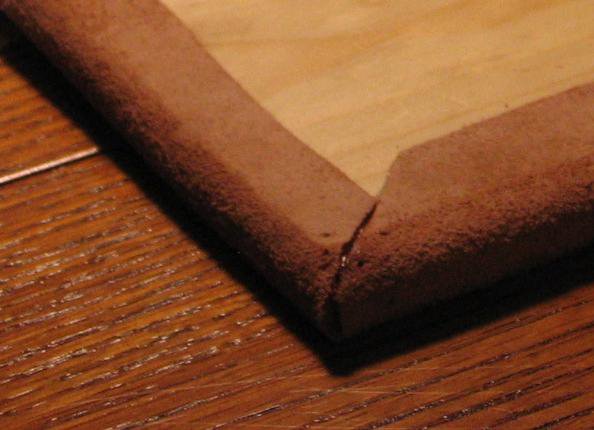
Some fudging is possible if you're going to use metal corners, but a bad fit is a bad fit and it will show, even with the corners on there. I've seen it, even if I wasn't binder enough myself to say what was wrong with the book in my hand, I knew it was wrong somehow.
Now its just a matter of glue, fold and press...
Always brush glue toward the edges. This alleviates the pooling in the middle effect that will give you a bad (read: "Lumpy") glue every time.

I use a combination of tacks, clamps and binder clips to hold the flaps down while I do the others. Be sure to tuck the leather under the bound edge of the book and clamp that area especially. That double-thickness at top & bottom of the spine add a lot to the stability of a book.

In the press. Since I'm doing this at the dining room table I decided to raise my ersatz bookpress up off the wood to keep from scratching things up. The title struck me as appropriate.
 Below is a montage of pictures of the final product. You can click for a larger view if you're curious. I'm ecstatic with the way it turned out. The final will be made with heavier rag paper and nicer leather (A nice blood-red Moroccan strikes my fancy) and will have pewter or at least silver-colored accoutrements. In the meantime, I'm going to have fun scrawling poetry in my current one.
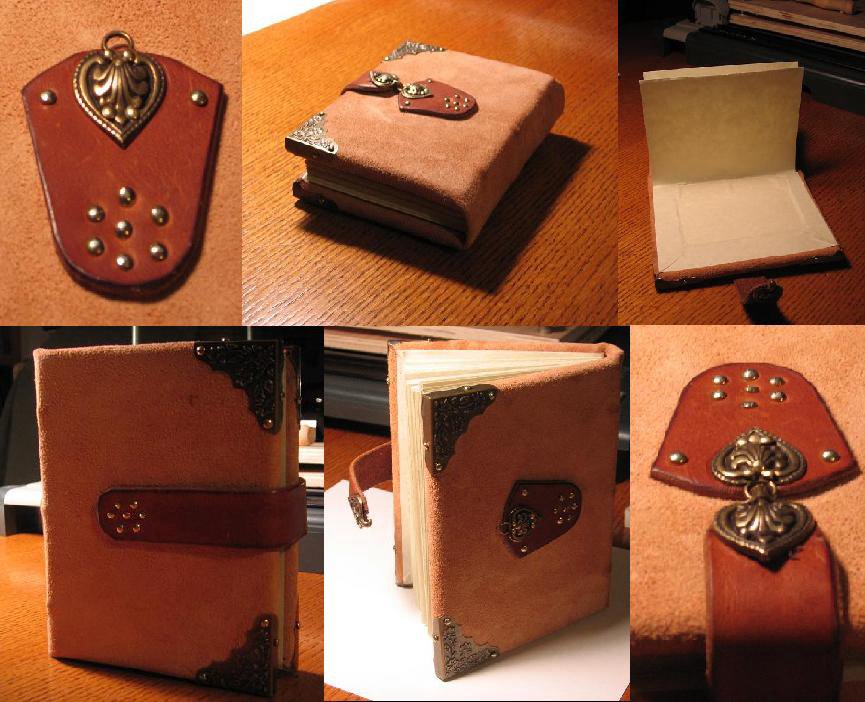
And now we return you back to doublet-making after a nice long walk down accoutrement lane to clear my head! Thanks for indulging me.
-Scott
That book is just amazingly incredible. And I am SOOOO happy to see a good, man-centric garb diary!!!!! Keep it up!
ReplyDeleteThank you Julebug!
ReplyDeleteSince I haven't installed a counter yet, I'm always left wondering if I'm just elaborately indulging a craving to talk to myself. :o)
-Scott